From Spam to Inbox: A Practical Guide to Cold Email Deliverability
After hours of researching your audience and crafting a flawless cold email, you may still find that the open rate remains low.
In this guide, I'll cover ways here that’ll help us ensure our sales emails arrive where they should so they get read and responded to!
If done right, deliverability can potentially unlock the full power of one of your most useful tools - outbound prospecting.
For example, after hours of painstakingly researching your audience and crafting a flawless cold email with strong follow-ups, you may still find that the open rate remains low.
As a sales rep, you know how crucial email communication is in achieving success. But when your messages don't make it through to the people they're intended for, you miss out on opportunities for meetings and deals - often without even realizing it.
One step we must pay close attention to is ensuring that our emails actually reach our prospects' main inboxes instead of their spam folder or promotions tab (since nobody wants their personal correspondence ending up there).
If too many end up in either category then any campaign will struggle - but I'll cover ways here that’ll help us ensure our sales emails arrive where they should so they get read and responded to!
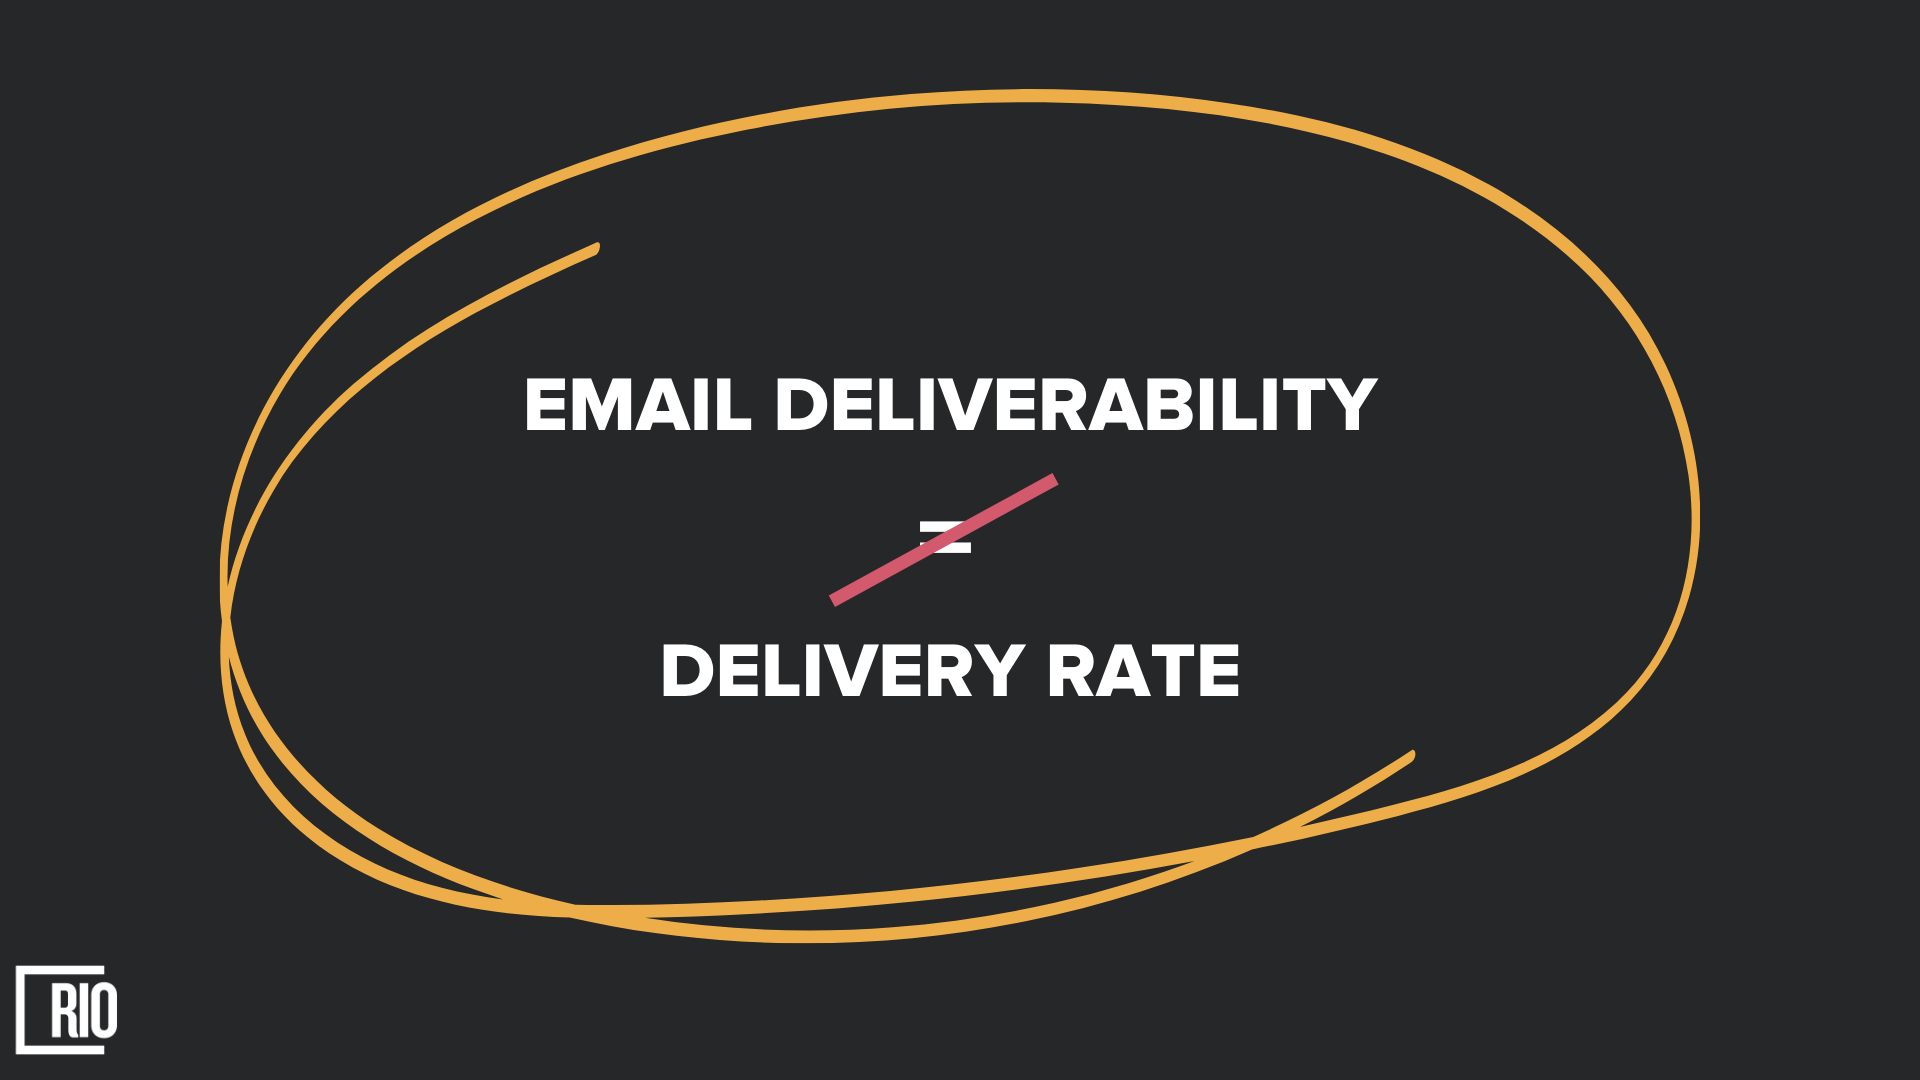
Delivery rates and deliverability are slightly different things even though people sometimes think it’s the same.
Your delivery rate tells you the success of getting emails accepted by the recipient’s server, while deliverability gives you an insight into which emails ended up in customers' primary inboxes.
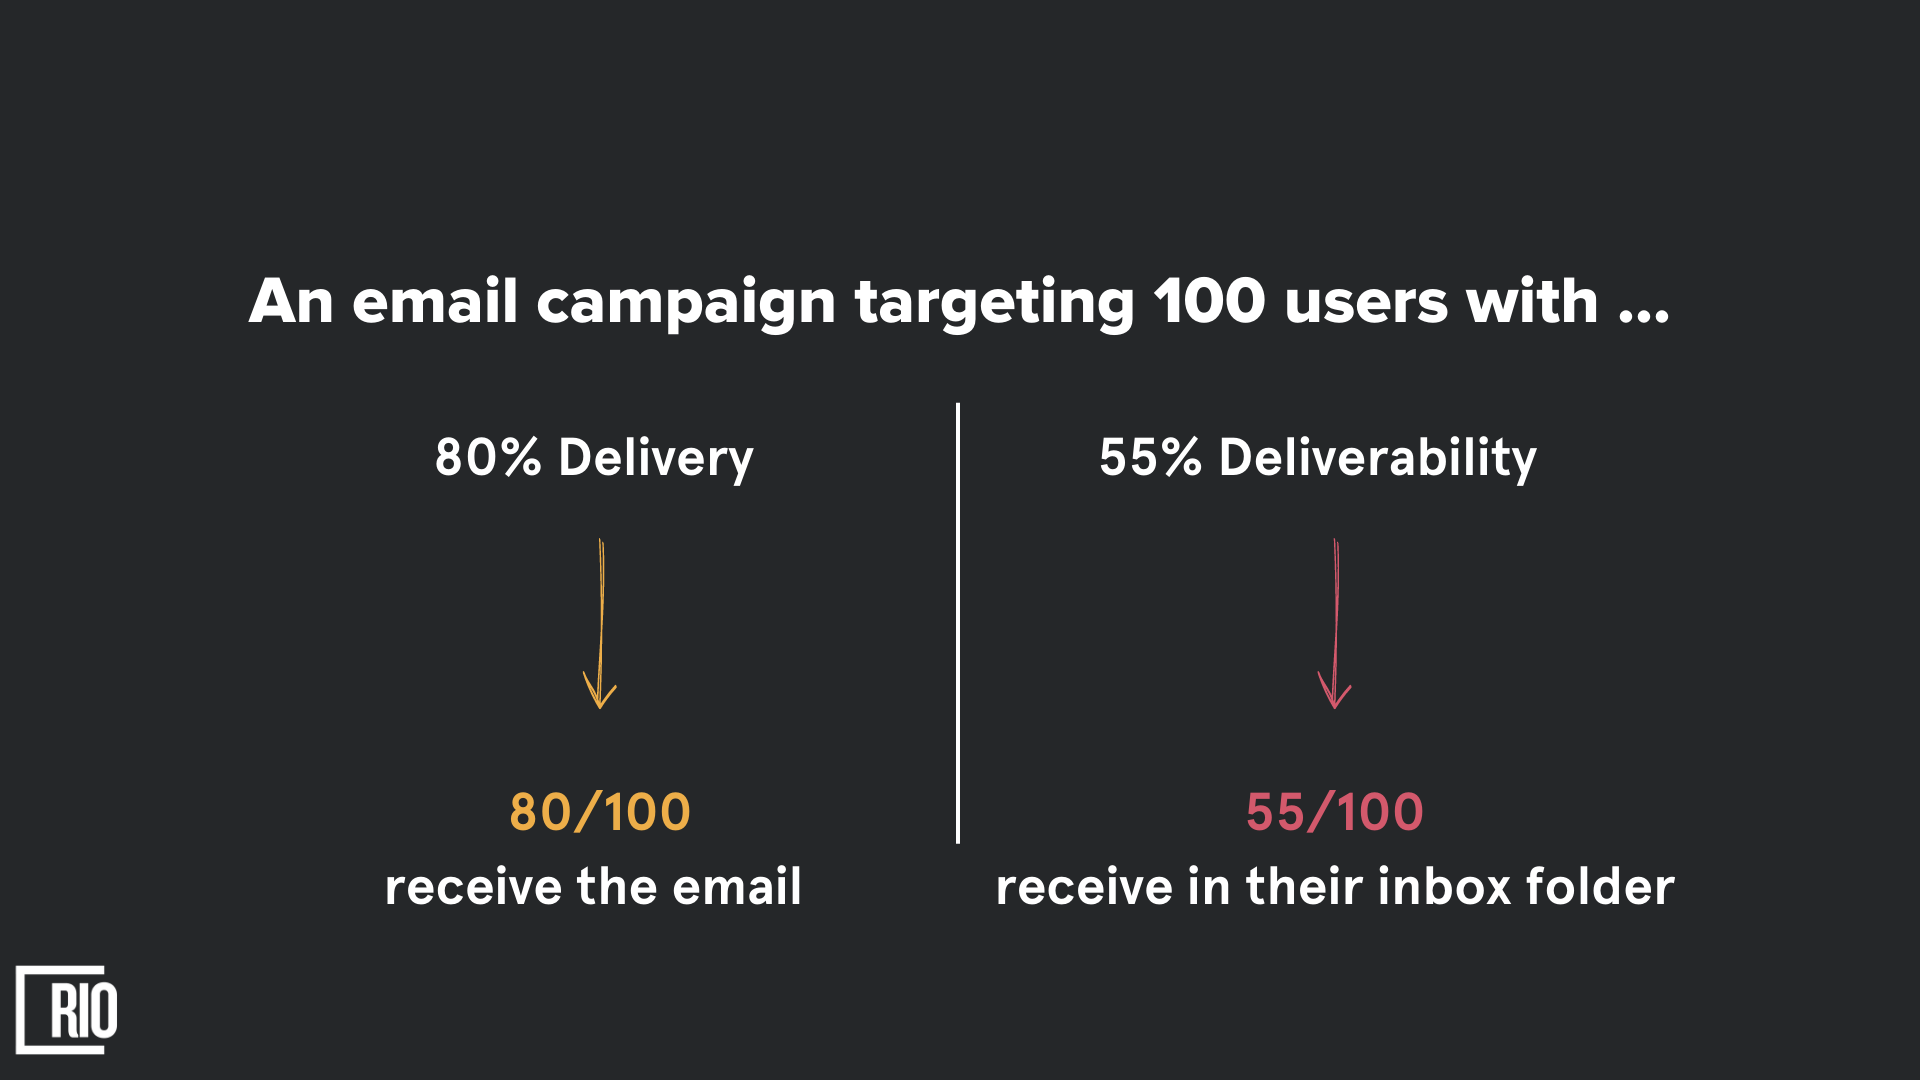
For example, say you sent emails to 100 people. 80 out of the 100 got the email, but only 55 of them went into their primary inboxes. The other 45 probably didn't see the emails because they went into the wrong folder (or spam) and hence were deleted or ignored.
Spam emails are a big problem. Gmail said that 50% of the 293 billion emails sent every day were spam. That’s way too much. To help you understand how big this is, let’s explain it with an example:
An SDR sends ten emails to his prospects.
Nine of those emails reach his prospects’ inboxes.
But:
Four of them land in the primary inbox.
Three of them land in the promotions tab.
Two of them landed in the spam folder.
Therefore, the deliverability rate is 40%.
The difference between these two numbers is very big and exactly those numbers (and your understanding of them) depends on your outreach success.
So, to sum it up again: delivery rate tells you if your emails got received, and at the same time, deliverability rate tells you if they're in the main inbox.
Why should you even care?
You can take a long time making your emails look nice, but if they go to the junk folder, there is no point.
As you know: cold emailing is different than sending emails to people who have signed up for them, plus it is more likely that cold emails will go into the junk folder.
In general, it's always harder to ensure cold emails get delivered than the ones people actually subscribed to receive or once already in email communication with you.
Why?
When you send emails to people who don't know you, the risk of their provider marking your messages as spam is alarmingly high. To fight this issue effectively, it's essential that you understand how email deliverability works in full detail.
ESPs and ISPs have put special systems in place to help protect us from unwanted and unexpected emails. Because of this, it's important to know how emails work, because learning the basics and rules of sending emails will help you get good results.
With each day, it’s becoming more complex to reach the inbox of your prospects due to the emergence of smarter spam filtering technologies.
That's why this guide provides a much-needed deep dive into everything you need to know about optimizing your emails for deliverability - so that they land safely and securely in the primary inbox of your prospects.
Why email deliverability is critical to your email strategy?
Good email deliverability is critical to your email marketing strategy, and here’s why:
You ensure your messages fly right into the inbox and wait to be opened.
The more emails you put in the primary tab, the higher chances they will be read.
You get a competitive advantage as you will have more chances to be visible among the tons of messages your recipients get every day. Not every competitor of yours tries their best to increase deliverability.
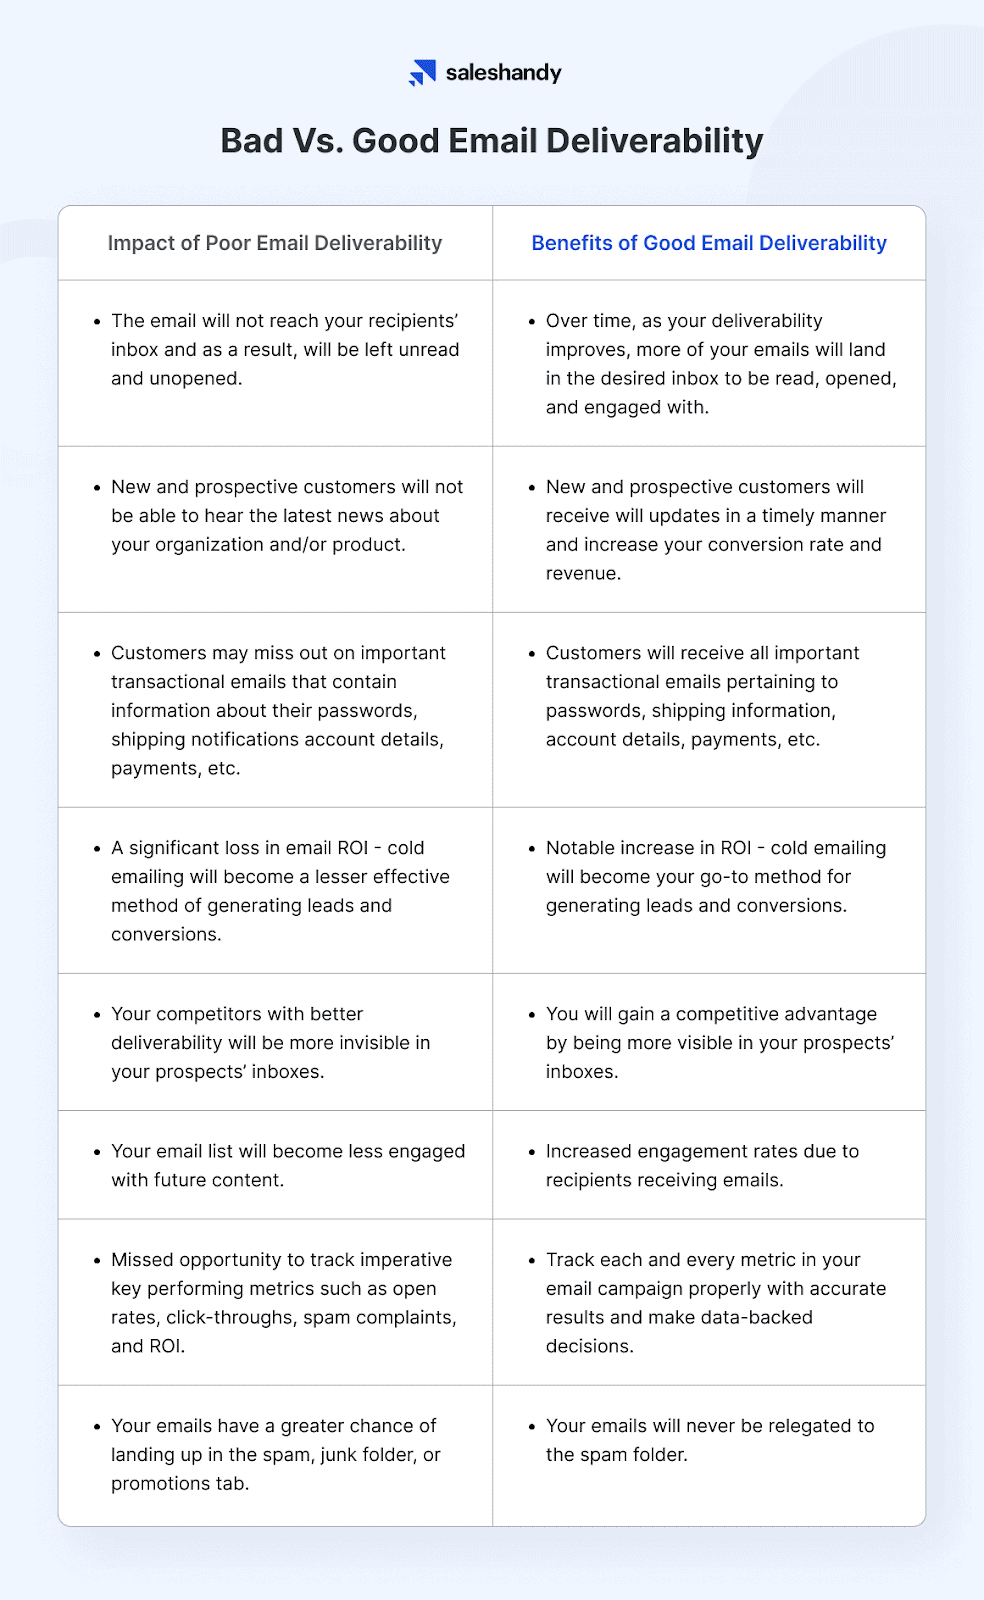
The negative impact of compromised email deliverability
Saleshandy did a great job of pointing out the impact of your deliverability, both good and poor.
Email Deliverability Checklist
There is always a possibility to miss out on some key elements that will make or break your deliverability rate. So, to keep your productivity here’s a small checklist that will help you keep track of all aspects that’ll get you the best deliverability rate possible.
It is difficult to find out how many emails will be delivered successfully. This is because companies like Google and Microsoft do not share information about their email data.
As well as that, you need to think about multiple metrics.
The main ones to consider are:
% of emails delivered
% of emails landing in the main inbox vs. spam
% of emails bouncing
To do cold emails well, your emails need to be delivered 95% of the time. If it is less than that, you have a problem. Make sure those emails go to the right place - in your prospects' main inbox and not their spam folder.
A simple way to check your deliverability is by using special tools, that will give you an explicit deliverability report. We’ll talk about these tools in our deliverability audit section of this guide!
These tools can show you if your emails are going to the right place, and check that your SPF and DKIM records are working correctly.
Don't worry if you don't know what SPF and DKIM mean, we will explain it later in this guide.
If you’re consistently seeing a bounce rate above 3-5%, it’s a sign that you need to spend more time validating your emails.
Suryanarayanan Pal, Growth and Product Marketer at Mailmodo, simplifies deliverability by comparing it to a traveling salesperson.
A traveling salesman needs to enter someone's house and then sell the product and an email marketer needs to get emails into people's inboxes first. Then they can use copy, design, and strategy to help them.
That said, to figure out how to boost your email deliverability, you need to understand the whole email-sending process.
Email delivery process
Say, you’ve just created an email for outbound prospecting. You’ve built and segmented your email list, and now you’re just about to press the “Send” button. Let’s see what follows step by step.
Step 1. Your email is sent
Most emails that are sent should be delivered. Those that aren’t accepted by the recipient server can be labeled as soft or hard bounces.
Once you’ve pressed the “Send” button, there are two possible scenarios:
1.1. Your email is delivered
In this scenario, you successfully deliver your message.
1.2. Your email bounced back
There are two types of bounces you might get: a soft or a hard bounce:
A soft bounce happens to your email due to several reasons, for example, the recipient’s inbox is full. A hard bounce occurs when you send an email to an invalid address, i.e., the address that doesn’t exist.
In this guide, we’ll talk more in-depth about bounces, their types, and what they mean, but for now, just remember those terms and we’ll come back to them a bit later.
The important thing to note at this point is: the biggest problem with hard bounces is that by having lots of them, you risk being treated as a fraudulent email sender.
Step 2. Your email is delivered/not delivered
The way emails get to the recipient is controlled by companies like internet service providers or other organizations that make sure emails are safe.
They protect their customers from receiving unsolicited emails by:
Establishing sending limits
Blocking suspicious senders
Default sending email to the junk or spam folder
Blacklisting.
When you send emails, some will go to the inbox. Others might end up in a spam folder, be blocked by the receiving server, or hit a spam trap.
2.1. Your email gets to the inbox
With everything in place, the only remaining step is to wait for your message to be read. However, it's useful to bear in mind that one out of every five emails can get blocked by receiving server or end up in a spam folder.
2.2. Your email gets to the spam folder
Getting into spam is a multi-layered topic that demands a bit of time and words to explain. So, to not miss anything out I dedicated a whole section about spam later on in this guide.
2.3. Your email is blocked by the receiver
Your emails may be temporarily rejected by the receiving server due to any of the following:
Your content appears too "spammy" (overuse of capital letters, punctuation marks, promotional phrases, or words that could trigger spam filters).
Receiving an excessive number of complaints.
Sending emails to invalid addresses.
2.4. Your email hits a spam trap
A spam trap is an email address that nobody uses. It might be one that someone used before but isn't using anymore, or it could have been made only to catch spam.
There are two spam trap types:
A pristine spam trap is an email address that has never been valid.
A recycled spam trap is an old email address that isn't being used anymore and was changed to a spam trap.
Step 3. Your email is opened/not opened
If you're not looking over someone's shoulder, how would you know if an email was opened? Modern email service providers include a tiny image in the emails they send - called a tracking pixel. When the recipient opens the email, the image is loaded (requiring a request to be sent to the server that hosts it). This request allows the provider to know that their message has been opened.
Open rate is one of the most important email performance metrics to track. And as for email tracking, you may get the help of special tools that track email opens right in your Gmail account for free.
Step 4. The recipient interacts with your email
What will your customer do after they get your email? They might click the link, close the email without clicking or mark it as spam. Each of these things means something different to you.
4.1. The recipient clicks the link
When someone reads your email and clicks on a link in the email, it gives a slight positive indication to the recipient server about you.
4.2. The recipient doesn’t click the link
Unlike the first scenario, if your email isn’t clicked through, it signifies you should work more on improving engagement. Yet, it’s not critical for the ISPs.
4.3. The recipient marks your email as spam
If you send emails with content that is not important, people might mark your emails as spam. This will give you a bad reputation. Make sure to respect people and give them an easy way to stop getting your emails if they want.
4.4. The recipient reply the email
The reply is the ultimate result that you’re looking for, as well as seen as the most positive indicator by the email servers.
How do you know if your emails are going to spam? Email Deliverability Audit
Email Deliverability Audit
How do you know if your emails are going to spam?
The Evolution of Spam Filters: From Rule-based to AI and ML
In the past, spam filters were relatively simple. To reduce the influx of emails from one particular source, they would just block anything coming from a specific set of servers.
However, spammers soon found ways around this by routing their messages through other countries. This led to the creation of the Sender Policy Framework (SPF).
Following this, rapidly improving filters such as those based on patterns, keywords, and special characters were developed in the early 2000s. These tools reduced ‘false positives’ - important messages mistakenly treated as spam - but they still made mistakes now and then.
It wasn't until much later that reputation scores became a thing, rating senders based on points like authentication & upkeep of mailing lists.
These days, some of the most cutting-edge spam filters use AI & ML technology to read billions of emails daily and improve how well they can detect malicious content.
Now it’s nearly impossible to recognize if your emails are going to spam from most email platforms. You can, however, do some detective work using your email analytics reports.
Start with testing how much of your emails are getting delivered to the prospect’s inbox.
Earlier in this guide, I already mentioned the fact that deliverability tools will become a must-have with a cold email campaign and now we're finally going to talk about it.
Introducing: Glockapps and SpamAssassin!
1) GlockApps
GlockApps is a comprehensive email deliverability and anti-spam testing platform, designed to help you evaluate your email campaigns and identify potential issues that may be preventing your emails from being delivered. It provides tools such as inbox preview testing, email authentication tests, and real-time monitoring of IP reputation scores.
GlockApps works by testing your email campaigns and then providing you with valuable data about their performance. It offers features such as:
Inbox Preview Testing - this allows you to see exactly how your emails will appear in the inboxes of major email providers (such as Gmail, Yahoo, Outlook, and Apple Mail).
Email Authentication Tests - this helps you to check that your emails are being sent from an authenticated domain, ensuring they reach their intended recipient.
Real-time Monitoring of IP Reputation Scores - GlockApps automatically monitors the reputation of your sending IPs or domains and can alert you if it detects any issues.
To get started you can simply create a free account, and it will give you a detailed report of what’s happening with the kind of emails you’re sending in great depth, as shown below.
I had this case when my cold outreach just didn't work. My emails went unnoticed and were left unresponded, and I honestly had way too many ideas about why it was happening. But I decided to run the test in GlockApps and here is what it showed me:
The result wasn’t the best, honestly, it was far from the best:
Inbox – 45.6% (Inbox rate is the percentage of messages that go through to the inbox)
Tabs – 1.5%(Tabs rate is the percentage of messages sent to different inbox tabs such as Promotions at Gmail or Newsletter at Netcourrier.com)
Spam – 52.9% (Spam rate is the percentage of messages sent to the Spam folder)
Missing – 0% (Missing rate is the percentage of messages not delivered to test mailboxes)
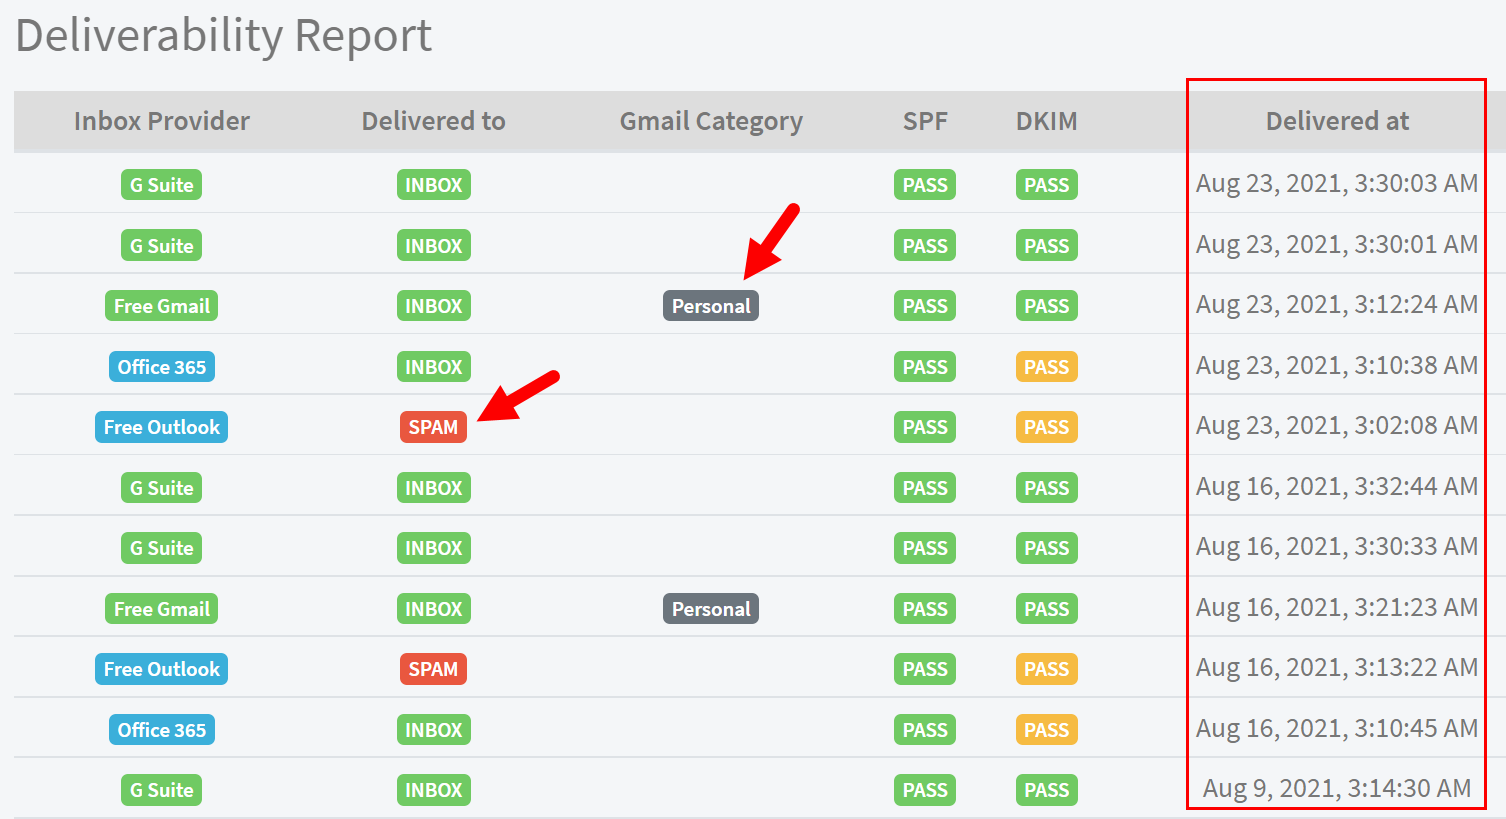
In general, your report will give you multiple layers of information.
It will give you info on providers' delivery: which provider delivered your message, who put you into spam and etc. In the report it will look like this:
Also, Glockapps gives you a very needed content analysis, that helps you to track if you used spam words or something went wrong with your HTML code, or your links/images are considered spam. The content analysis will look like this:
But the most important thing apart from reports, Glockapps gives you action steps. This is a small but very effective manual of what you need to do to improve the state of deliverability.
In the tool, this manual looks like this:
You see? That's the ultimate deliverability report that I needed. At that point, I learned that most of my emails went into spam, and from that on I knew what I can change in order to increase deliverability.
2) SpamAssassin
What is SpamAssassin?
Apache SpamAssassin is a program that finds spam emails, it gives each email a score from 0-5, with 5 being very spammy. If your email gets a 4 or higher, then it might not be delivered at all.
How is your SpamAssassin Score calculated?
SpamAssassin developers keep the factors involved in the score calculation public. Also, it looks at other spam filter scores to help it decide if an email is a spam.
These are some key elements checked by SpamAssassin:
Main Domain and IP blacklists/greylists/blocklists
Collaborative spam identification databases
SPF and DKIM protocols
Header and Body content
Broken or shortened URLs
Multiple sender reputation systems
SpamAssassin is a complicated program. It looks at other spam filter scores to help it decide if an email is a spam.
How to improve my SpamAssassin Score?
The best way to improve your SpamAssassin Score is to follow clean emailing practices:
Clean your mailing list to avoid bounce. Don't use bought mail lists.
Set up authentication protocols (SPF, DKIM, and DMARC).
Monitor blacklisting/greylisting.
Send relevant content to avoid being reported as spam.
Use List-Unsubscribe Header to make things simple for your subscribers.
Take care of URLs in emails (avoid broken links and shortened URLs).
Avoid using shared IP to fully control your sender reputation.
Now that you can tell if your email reputation is good or bad, let's look at what factors are important in calculating your email reputation.
Factors for deliverability
Let’s look at the bigger picture.
To make your deliverability great you need to nail 4 out of 4 key elements that make your email not only deliverable but also desirable. Each element is a category of its own, so in this section of the guide, we’ll go into detail about each element one by one.
Before we start, here is a quick round-up of the 4 factors of deliverability!
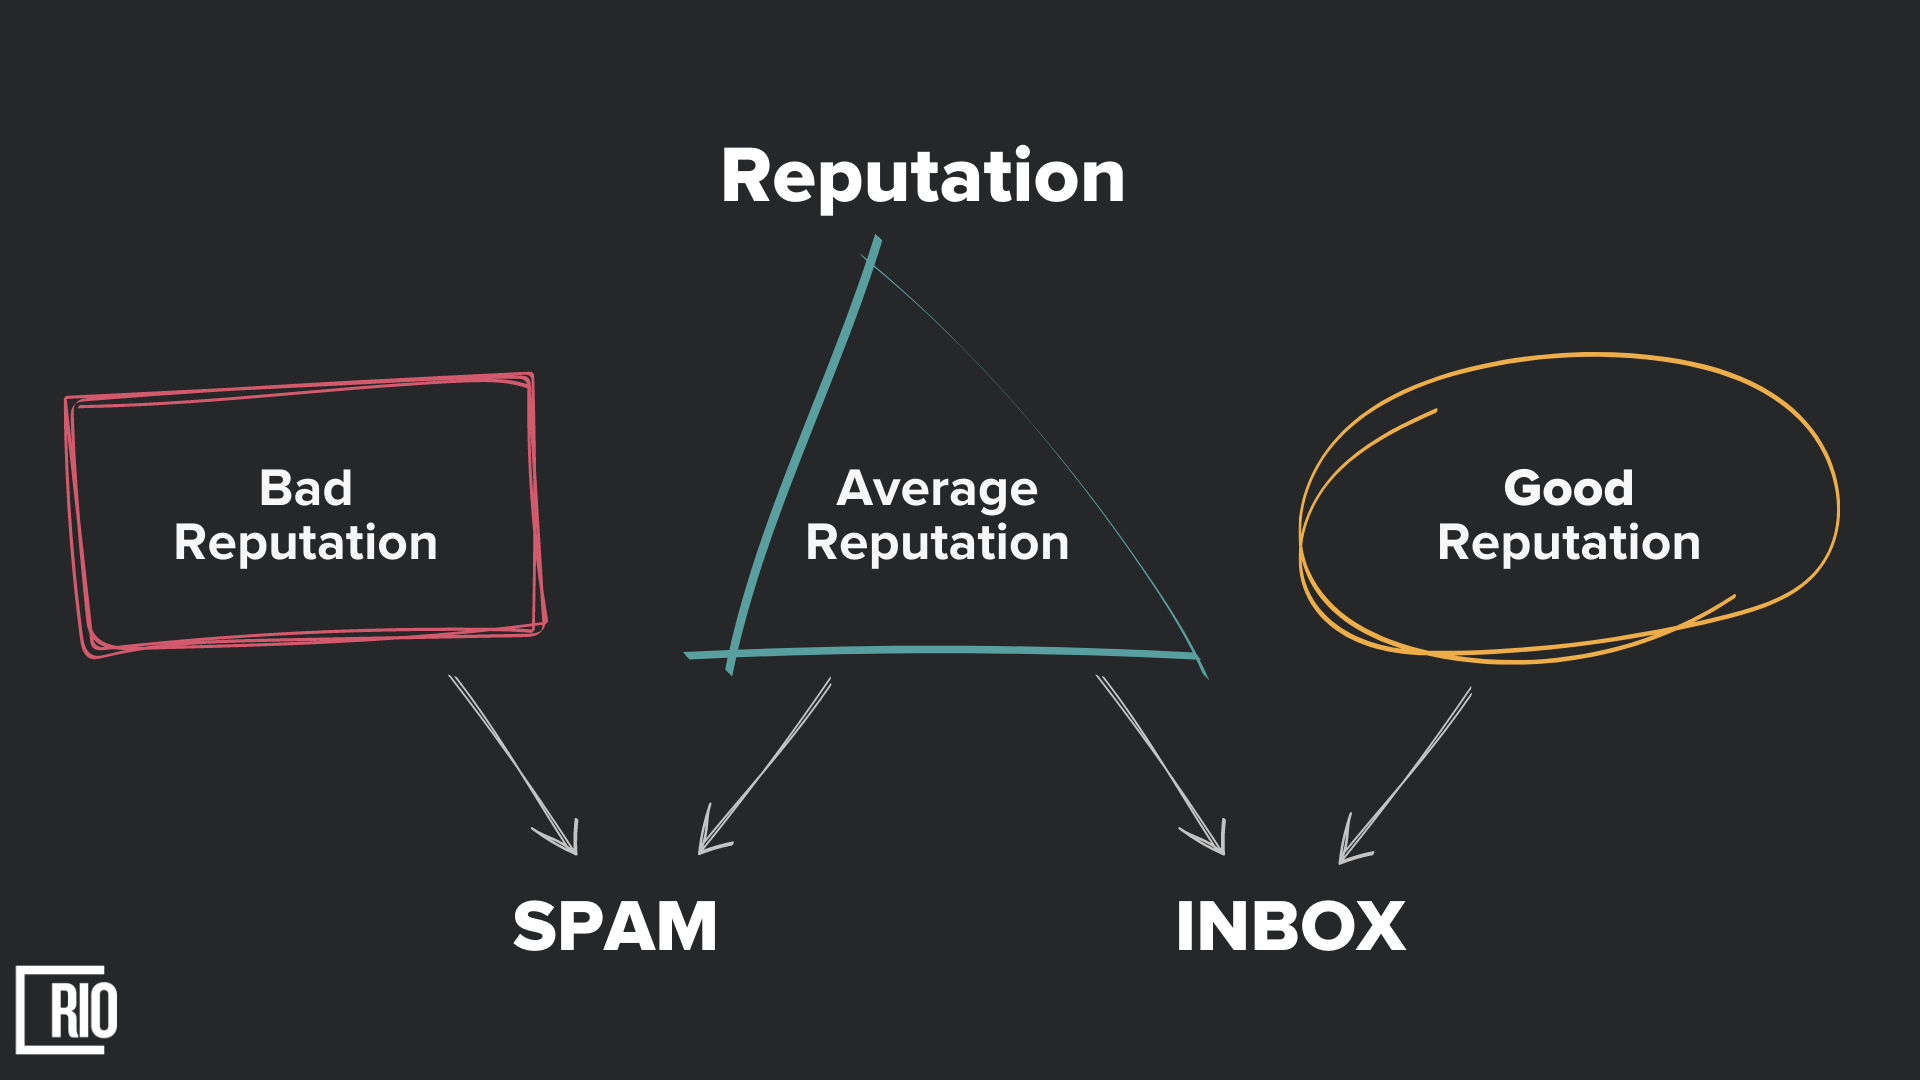
Trustworthy Sender
Email reputation is determined by two main things: IP reputation and domain reputation. Even though they are evaluated independently, both factors have a significant effect on the ability to deliver emails.
What is a good domain reputation?
Domain reputation is the overall “health” of your domain as interpreted by mailbox providers.
Look, your domain is known to providers and your domain already has some history. For example, you sent your previous campaign all in one go and all of your emails were marked as spam.
Or your emails look suspiciously like an ad and they landed in spam once again. Or you sent a lot, a ton of emails during one week a year ago, and already forgot about it.
But the providers didn’t forget.
They analyzed your domain and deemed it as unhealthy, a domain with a bad reputation.
What in turn made you a spammer in their eyes?
All of your past actions: good or bad - of them contributed to building your domain reputation.
What is IP reputation?
Emails are sent from a computer or server with a unique identifier, the IP address. ISPs find it easy to trace senders based on this IP address.
IP reputation is calculated solely on the basis of the IP address from which the email was sent. It does not have any direct association with the sender's brand.
Senders either have dedicated IPs or use shared pools for sending emails. IP reputation is necessary to ensure that your email reaches its destination; it determines how likely an incoming message is to be accepted by a recipient server.
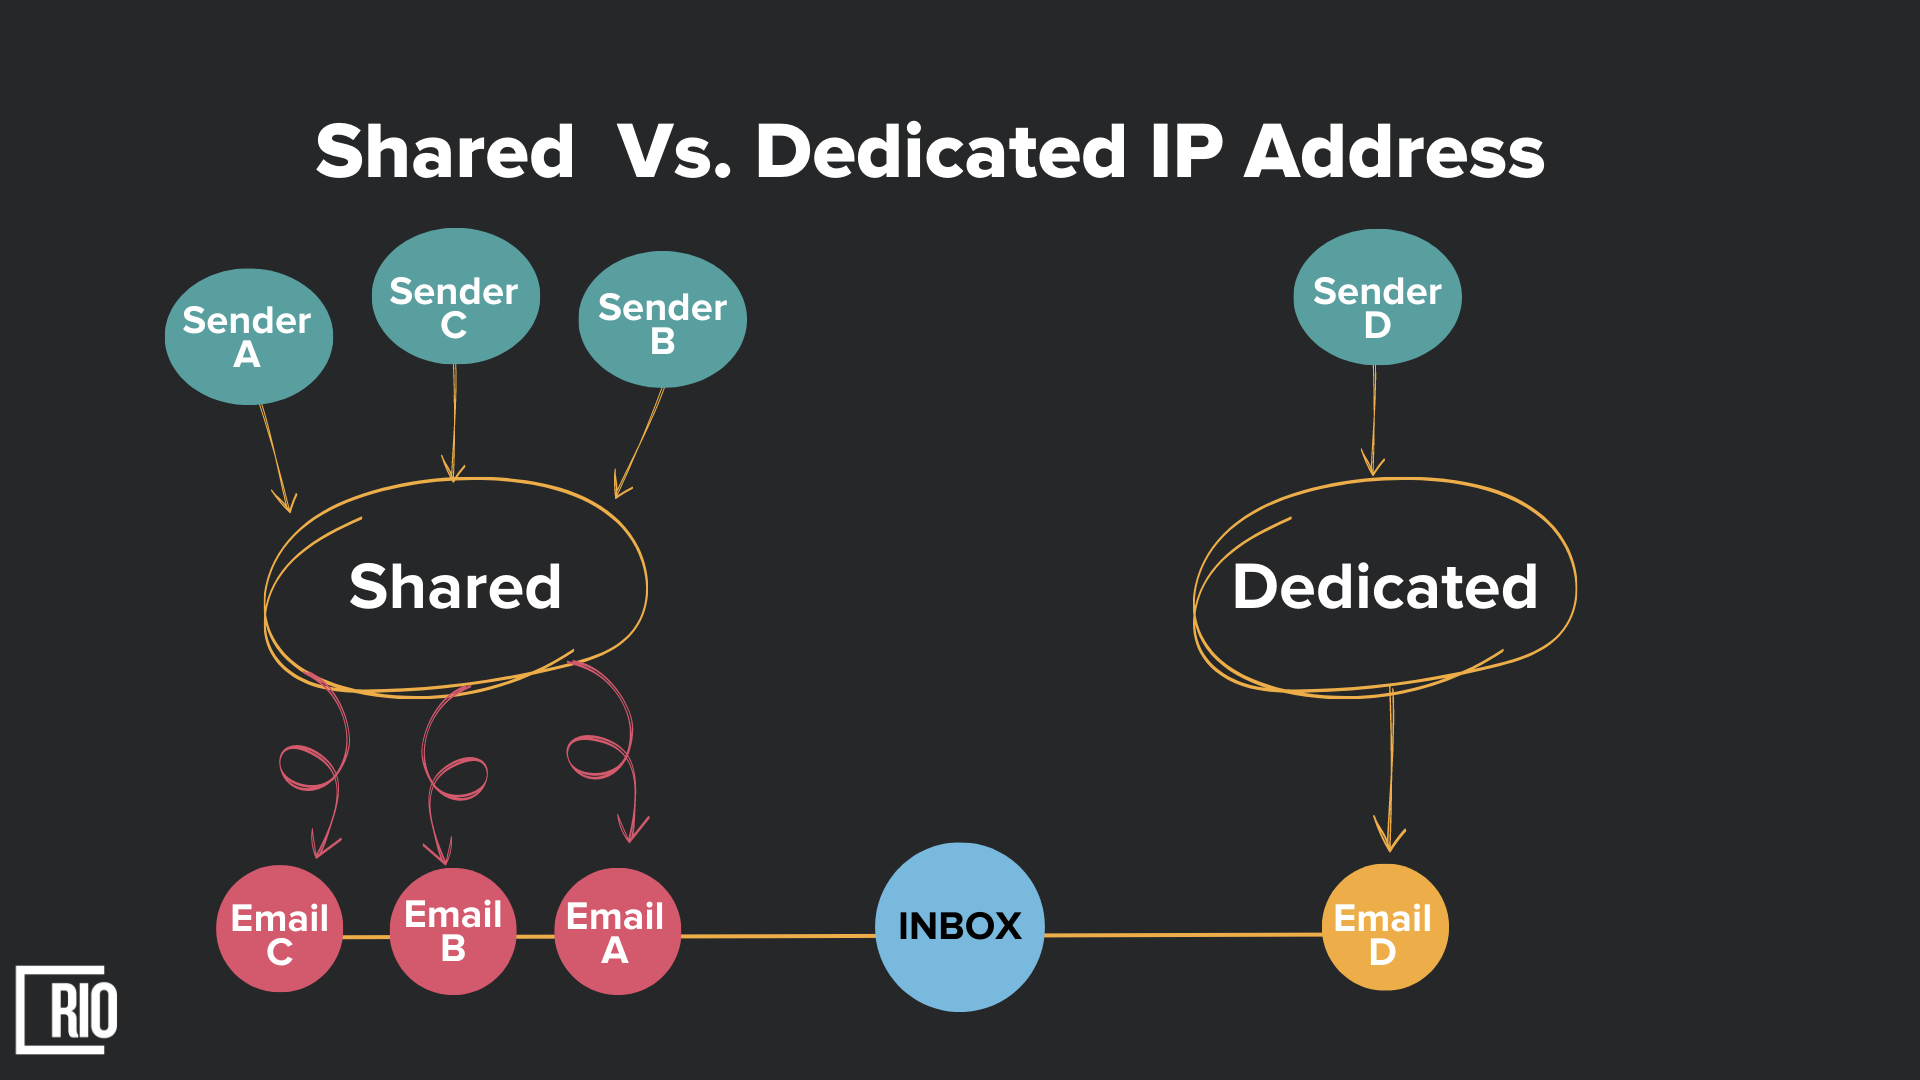
What's a dedicated IP address?
Having a dedicated IP address for your emails ensures that all messages are routed through the same address. You are solely responsible for any content sent using this IP, so it's important to maintain emailing best practices to ensure successful delivery.
Dedicated IPs make more sense for organizations with large email volumes, as they have the capability to adhere to strict deliverability standards.
What's a shared IP pool?
A shared IP pool is when a lot of companies share the same IP address. This means that everyone in the group has a responsibility to make sure emails get sent correctly and if someone does something wrong, it can hurt everyone else's reputation.
Smaller companies might not send enough emails on their own to have a good reputation for sending emails. A shared IP pool helps them because other companies are also sending their emails with it and this makes everyone look better.
Also, a shared IP pool helps small senders avoid expensive problems. If one small sender makes a mistake, it won't hurt them as much because there is a lot of email coming from the shared IP pool. If they make the same mistake with their own dedicated IP address, it will be harder to fix...
We don’t want to come across as spammers, but that’s how email providers initially see us.
To change that, we need to maintain a good domain reputation and it’s easy if we include these «good» factors:
Personalization. Make sure that your emails are highly personalized to avoid that staged, artificial feel of generic, bland messages.
Relevance. Tailor your emails so that they’re relevant to your recipients, which means that your list should be properly segmented.
Authentication. Your domain has to be authenticated before you engage in any cold outreach activities.
When it comes to cold emailing, it's important to make it as personalized and natural as if you had sent it yourself.
For now, we’ll go into the technical detail of this guide but later we’ll also talk about personalizations and about your email content in general, so stay tuned.
Spam Traps
Now, let’s talk about spam traps, which I hinted at earlier in this guide.
Spam traps are used by inbox providers and blacklist providers to detect malicious senders, but legitimate senders with poor data acquisition practices can also get caught up in them occasionally.
These traps look like real email addresses but they don't actually belong to a real person, and their only purpose is to identify spammers and those who haven't implemented proper list hygiene.
No one is immune to spam traps – even a single instance of this on your mailing list can make it significantly harder for your emails to reach their destination inboxes. Emailing relevant content to old or invalid addresses can be considered an indicator of bad data collection practices, which could affect your sender's reputation.
To better understand how spam traps end up on your mailing list, it's important to look at the various types of these traps.
For example, Laura Atkins, email deliverability expert and owner of Word to the Wise, put together a comprehensive list of spam trap categories.
Sometimes, you can get spam traps without doing anything wrong. Different types of spam traps are created in different ways and they can cause different problems.
But what kinds of spam traps even are there? Let's look at them one by one:
Pristine traps
Pristine spam traps are email addresses created by ISPs or other organizations that have never been used by an actual person. These are hidden within a website's code and can only end up in your list if they're scraped from sites or bought from untrustworthy sources.
When someone sends emails to them, the ISP will return a hard bounce as a signal to remove the address from their list, but some senders ignore this and keep emailing them.
Spam traps can also come from people who enter fake addresses into forms or those who accidentally misspell their addresses - both of which could lead to you sending an email to a spam trap. If this happens, your domain/sending IP may be blacklisted and can have severe consequences for your sender's reputation.
Recycled Spam Traps
Recycled spam traps (also known as honeypots) were once valid email addresses but are now used by providers to catch spammers. These could be role-based emails (like sales@, info@, support@) or even of former employees.
Being on your list for more than a year or not receiving emails from you frequently can result in a recycled spam trap being present. While the consequences of hitting such a trap are milder than if you sent an email to a pristine one, it still damages your sender's reputation if done regularly.
Over time, this can lead to your emails being routed to the junk folder instead of the inboxes of your subscribers.
Typo Spam Traps
From typos such as 'gnail' instead of 'gmail' to fake email addresses like 'donotmailme@thankyou.com', spam traps can exist in various forms. While not as damaging as pristine traps, they still identify the sender as negligent and harm their sending reputation over time.
But how do you know if you are sending emails to a trap? Since they look like regular email addresses, spotting them on your list can be tricky. That's why it is important to regularly clean your contact list and monitor your emails for hard bounces and other red flags.
There are a few handy tools that help you evaluate your sender reputation and show whether or not you’re sending to any spam traps. Microsoft’s Smart Data Network Service (SNDS) is one example of such a tool.
How to avoid spam traps?
To tackle this question, let's shift our gaze and gain some perspective about spam traps, shall we?
If you're a business or an individual who regularly sends many emails, staying well-versed with spam traps and their significance is crucial.
So, let's dive into some noteworthy tips and tricks that you can use to keep your email lists safe from spam traps, and elevate your email marketing game!
1) Periodic maintenance and combing
To prevent falling prey to spam traps, it is essential to keep email lists up-to-date by cleaning them regularly. This will give you an opportunity to evaluate the list and identify any inactive email addresses that may be spam traps set up by people who no longer use them.
2) Your actions define you
Just like the physical world, your reputation is essential in an online environment. So you need to keep in mind that what you do will define your credibility online.
Therefore, it is important to stay away from any practices that portray you as a spammer for the sake of preserving your reputation.
3) Avoid buying email lists or be careful when doing so
Having an email list filled with spam traps is, unfortunately, a common consequence of buying or renting lists. This often results in damaging your business and reputation due to acquiring information through illegal and malicious means such as scraping or phishing.
Emails found on forums or sites can be difficult to verify and therefore should not be trusted. ISPs and anti-spam organizations are known to post fake emails across the internet to bait scrapers and spammers; being exposed to these emails may mean you have exposed yourself to spam traps as well.
4) Scrubbing is good
Just as you go through the effort of organizing and maintaining your email list, look out for any incorrect emails or misspellings. Also, be mindful of disposable and temporary email addresses which are often used to avoid spam or test certain services or software. Locating and dealing with these emails is essential in order to keep your list accurate and authentic.
5) Email Validation tools
An effective way to avoid spam traps in your email list is by ensuring that the addresses have been validated first. Utilizing a validating tool can assist in this process, helping you to guarantee that only authentic emails are included in your list.
6) There is no short-cut
It's true that there are no shortcuts to success, despite what some people might think. Wanting to expand your business and attract more customers is great, but it's important to be aware that the only way to achieve this is through hard work, honesty, and perseverance. Cheating is not an option.
Bounces
If you're serious about avoiding spam traps and bounced emails, building a list of qualified contacts is essential. Relevant content must be sent to the right people - otherwise, too many spam reports and bounces could lead to blacklisting, an issue that we will explore further later on.
At a minimum, to avoid bounces, verify your email addresses, and remove hard bounces immediately, and soft bounces after multiple attempts.
Quick note:
Hard bounces: A hard bounce is when an email can't go through. Usually, this means that the address is wrong or not working anymore. Cleaned addresses will be excluded from all future campaign sends. Here are the two most common reasons an email may hard bounce:
a) The recipient's email address doesn't exist
b) The recipient's email server has completely blocked delivery.
Soft bounces: Sometimes emails don't get sent due to a temporary problem. While tools like Mailchimp will usually show which addresses are being soft-bounced, many email tools will not distinguish between hard and soft bounces in your campaign report.
These are some common reasons why an email can soft bounce:
Mailbox is full (over quota).
Mailbox is not configured correctly.
Mailbox is inactive.
Recipient email server is down or offline.
Recipient email server has been sent too many emails during a period of time.
Email message is too large.
Domain name does not exist.
Email messages are blocked due to content.
Email message does not meet the recipient server’s policies.
Email message does not meet the recipient server’s DMARC requirements for authentication.
Email message does not meet the recipient server’s anti-spam requirements.
Email message does not meet the recipient server’s anti-virus requirements.
Email message does not meet the recipient server’s sender requirements.
Email cannot be relayed between email servers.
Email cannot be relayed for unknown reasons.
The quality of your email list is pivotal in ensuring successful deliverability and preventing emails from getting sent to spam.
For top-notch contacts for deliverability and overall email success, look no further than LinkedIn.
Why?
The data is fresh: most people on LinkedIn update their profile.
The data is rich and complete: you have the name, job title, company, number of employees, industry, etc… That’s a treasure for cold emailers.
The data is easy to extract: that’s pretty quick and easy to extract data and find emails out of LinkedIn thanks to third-party tools (list below).
How to clean your list is the best way to prevent your emails from being marked as spam.
Having an email list of quality contacts is awesome, however, that's just the beginning. To get maximum returns on your campaigns and ensure successful deliverability, putting in the effort to make sure your list is up-to-scratch is a must. The time invested in fine-tuning your contact lists will be more than worth it!
This is the list of actions you need to do before going to the next step :
Correct first names and last names inversions: Sometimes people put their last name first and their first name last on LinkedIn. If this happens, don't start your email with "Hi Last Name". That might make it obvious that you’re using automation.
Remove irrelevant job titles:When you look for people with "CEO" in their job title, some people may be listed as "Right Hand to the CEO" or "PA to the CEO". If these people don't fit what you are looking for, take them off your list.
Remove irrelevant companies: Irrelevant industries, competitors, nonprofits, actual customers, etc.
Do these steps to make your list better, without making mistakes. That way, people won't get mad at you and not send your emails to the spam folder.
The best email verification strategy to avoid the spam folder in the long run.
Maximizing the success of your campaigns starts with a verified email list - ensuring that all invalid addresses are removed. Verifalia and DeBounce are great tools for this job, and if you'd like to compare check out this article.
You'll want to categorize your list into the three main verification categories:
Success (the best but not guaranteed 0% bounce rate);
Risky (mainly Catchall emails with errors such as timeouts);
Undeliverable (bad and ugly emails that should be excluded right away).
For optimal results, focus on the 'Success' contacts when first starting out - and gradually add more Catchall emails later, capped at a maximum of 25%. This way you have better control over your bounce rate, helping to ensure it remains below 3%.
Blacklist
A blacklist is a real-time list that identifies IP addresses or domains that have a history of sending spam emails. Nearly all ESPs use this blacklist to protect their users against spam.
The IPs and domains of spammers are put on this list if they continually send out mass spam emails. If the recipient’s email provider utilizes blacklists, the IP of the incoming sender is checked against this list.
If the sender’s IP is listed on the blacklist, their email will automatically be rejected and will never get delivered - meaning it won't even make it to their inbox! Check out the image below for more information about how blacklists interact with emails.
Source: Spamhaus
Sometimes your ESP will notify you that you have been blacklisted, but generally, most people have to do a manual check.
Here are the two most common services that compile anti-spam lists:
If you find yourself blacklisted, it's important to figure out how to get off as soon as possible.
Sometimes proving that you are not a bot or a spam account is all you'll need to do in order to get unlisted. However, it's also essential to understand why your IP address or domain was put on the blacklist in the first place and take action accordingly.
Some blacklists will automatically remove your IP after a certain amount of time- but only if you stop acting like a spammer! Being taken off the blacklist is always great news... But don't celebrate too soon - usually, you can expect close monitoring of your email-sending habits going forward.
Domain blacklists
Trust and reputation are key when it comes to sending emails - which is why Domain Blacklists exist.
These real-time databases identify domains that have been known to send out spam or malicious content. ISPs (Internet Service Providers) and specialized organizations use these sources as references to determine whether a particular incoming email can be trusted or not.
If your domain finds itself on the blacklist, it's likely your emails will end up in people’s spam folders. This is due to its history of negative behaviors.
Your domain has risks to be added to a blacklist if:
You have a high bounce rate (soft or hard) on emails you send.
You have a low engagement (open rate, answer rate, etc.) on emails you send.
You have a high proportion of emails sent that are flagged as spam by recipients.
You send emails into "Spam Traps" (inactive email addresses that are used to spot spam behavior and poor list hygiene).
Your domain is compromised and used by spammers against your will.
Good sending practices and active authentication protocols (SPF, DKIM, and DMARC) can help you to reduce the risks to have your domain blacklisted.
Don’t worry in this guide we’ll go into detail about each of the authentication protocols and will discuss why should they matter to you. But for now, let’s stay on the topic of blacklists for a little bit longer.
You can check for your domain in blacklists using blacklist-checking tools. If you happen to come across your domain on a blacklist, you should contact the responsible party and ask them to remove your domain from the list.
Note: Creating new email accounts with new domains helps keep your main domain from being blacklisted and ending up in SPAM. Your new domains should be similar to your current domain so that the people you are trying to reach out to don't get confused. For example, if your main website is startuptoscaleupnow.com, you can use the following domains for cold outreach:
startuptoscaleup.io
Startuptoscaleup.ch (coz, let’s say you’re in Switzerland)
startuptoscaleup.net
startuptoscaleup.org
The process is as follows:
Buy the new domain (as outlined above).
For each domain, you make, create a new Google account using a different email address and phone number. This will help you keep track of everything and make sure your websites are backed up.
If you want to expand, buy some new domains. The older a domain is, the better it looks to others. But here are some key things: Make sure each domain has a different Google account. This is the account people use to access Google services. Ideally, the accounts should not be connected in any way and should have different backup emails and phone numbers.
Redirect all of your domains to your main site.
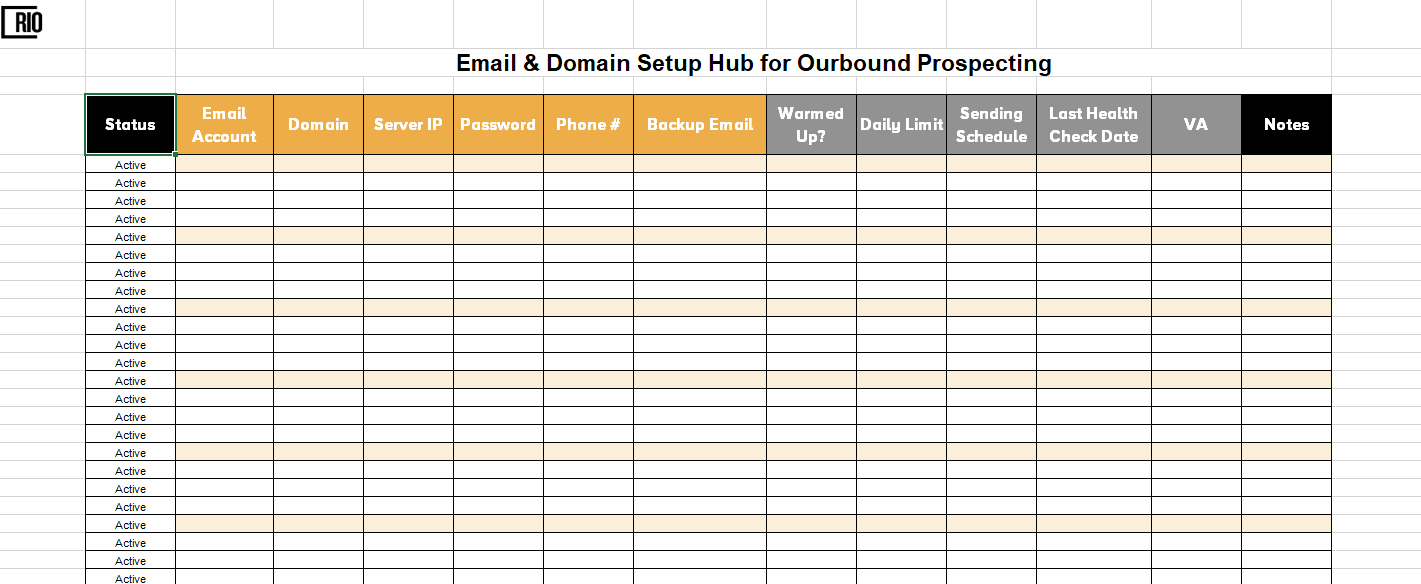
Use this Email Setup Hub to maintain and keep up with your email accounts:
Creating a lot of emails can bring a whole new headache that you do not expect. To help you keep track of all emails that you’ve created and now using I created this easy template.
So cure your headache before it even starts and use my template in your outbound campaigns.
Let's talk about IP Blacklists - powerful databases that keep an eye out for IP addresses that are notorious for transmitting spam or malicious content.
As in domain blacklists, these lists are put together by internet service providers (ISPs) and specialized organizations and play a vital role in email servers. They're like a trusted reference point that helps these servers decide in the blink of an eye whether or not an incoming email can be trusted.
Your IP has risks to be added to a blacklist if:
You have a high bounce rate (soft or hard) on emails you send.
You have a low engagement (open rate, answer rate, etc.) on emails you send.
You have a high proportion of emails sent that are flagged as spam by recipients.
You send emails into "Spam Traps" (inactive email addresses that are used to spot spam behavior and poor list hygiene).
Your IP is compromised and used by spammers against your will.
Your IP is shared between multiple senders, that may use it to send spam.
The same as in domain blacklisting, good sending practices and active authentication protocols (SPF, DKIM, and DMARC) can help you to reduce the risks to have your IP blacklisted.
Volume
If you buy a new domain and send too many emails too quickly, people will think you are sending spam and this will make it hard for your emails to reach people.
What do you do then?
Here you need to start by sending a low volume of emails out, and slowly work your way up.
For example:
Week 1 + 2: Purchase domain, only use it with co-workers and existing clients
Week 3: 5 emails per day
Week 4: 10 emails per day
As you go along, you can gradually send more and more emails. If people respond to your cold emails often enough, you'll have plenty of work to do. If you need to send a lot of emails, try using more than one email account instead of just one.
QuickMail has a useful inbox rotation feature to help you spread email volume across your team and company.
Adding all of the email accounts from your team will enable you to safely send more emails than when using just one account. But be aware even after warming up your account, it's essential to take note of the sending limits in place.
For example, Gmail users are limited to 2,000 emails per day (you shouldn’t get anywhere near that), and Outlook users are limited to 1,000 emails to ‘non-relationship recipients’, which means people you’ve never interacted with before. How to Warm Up Your Email Address
If you prioritize email deliverability, you've likely come across the concept of 'warming up' an email address. When it first starts sending emails, the inbox you're using may not be seen as credible by ESPs (Email Service Providers), which can lead to lower delivery rates.
By 'warming it up', however, you can speed up the process of gaining trust from ESPs.
Traditionally, this would involve reaching out and emailing co-workers, clients and people who are likely to reply to you.
Nowadays there are email warm-up tools such as MailFlow (it's free to use), which will automatically warm up your email account by sending emails to other people, creating automatic responses, and marking them as “important”.
Within MailFlow, you’ll be able to see a handy report, showing you where your emails are landing.
Over time, this will show ESPs that you’re using your inbox in a regular way, getting engagement, and don’t deserve to land in the spam folder.
Each freshly set up domain needs time to earn a good reputation
For the sake of IP/domain reputation security, it’s recommended to set up an email address on a separate domain for outbound communication.
However, it's not uncommon to see users set up a new domain and email address, and then start sending 50 emails per day automatically within three days or so – which is a very easy way to get blocked by the email providers.
Every domain has its own reputation – good, neutral, or bad – that can only be earned over time. A brand-new domain starts off as neutral but is often viewed with suspicion by hosting providers.
If you start sending bulk emails automatically from an address on this new domain, you confirm their suspicions that you may be a malicious user, i.e. a spammer.
This is why it's recommended that if you set up a new domain specifically for outbound campaigns, you should wait at least 12 weeks before sending out your first cold message - while also taking the time to gradually warm up your email address(es) registered with it during this period.
Send a few emails a day by hand
If you've got a domain that's less than 6 months old - sending a few emails by hand each day is essential to make sure it doesn't get flagged as spam. So it's best if you show your human side and don't use any kind of automation. Additionally, low engagement levels can be penalized for new domains.
Say you have a 10,000 contact list with 6,000 of these on G Suite or Gmail. You send out a 4-email sequence with only a 5% open rate. That leaves 22,800 unopened emails on Gmail servers from your domain which will cause your reputation to drop from medium to low and negatively affect future messages - dragging your score down from low to bad!
The solution? Start slow and simple: manually reaching out to family and business partners is the perfect way to reconnect with them outside the scope of sales emails. Plus, collecting addresses set up on different providers such as Gmail, Outlook/Exchange, GoDaddy, 1&1 Yahoo!, AOL etc. will help your domain reputation among various hosts.
Write like a human
When sending emails, make sure the content is worth reading. Don't just send any random bit of text - make it more human-like and add some personality to it. Not sure what to write? Try looking up funny stories or jokes on the web and share them with your contacts. Even better, ask some questions in those emails - this will encourage people to reply and get an invaluable engagement boost for your new domain!
Collect a few responses and reply back
Ignore those pesky unopened emails and start a conversation instead! Collect a few replies by sending some emails from other addresses to your new one - don't forget to reply too! Bonus points if the replies come from different email service providers - this way, you can interact with others on the same platform as your new domain. Before launching any automated campaigns, make sure to have some regular conversations with that address - it's the best way to get off on the right foot!
What after the warm-up part?
Give your email address the chance it deserves and perform a proper warm-up - don't rush things! Your activity will be closely monitored by your email service provider, so take the time to send personalized messages that you know will get to your prospects' mailboxes.
If you're short on time, find a reliable warm-up tool to help you out.
After an adequate warm-up period, your mailbox will be ready to start sending cold emails fluently, ensuring top-quality campaigns with great deliverability results. Of course, you'll need to keep a constant eye on factors like message quality and prospect base for long-term success.
Make sure to keep your cold emailing activity as human-like as possible. Limit your emails to 200 max per day per email address and domain for best results.
Remember, the fewer emails you send each day, the better for your reputation and deliverability - even when sending warming emails! If you can limit yourself to 100 emails a day, that's even better. Keep it natural and you'll see better results.
If you need to send a higher volume per day, follow these guidelines.
Buy different domain names
Create one email address per domain. Why? Because if an address lands in spam it will not affect all the other addresses on the same domain. That’s important.
Keep generating positive engagement on each email address with constant warming.
To increase your chances of landing in the main inbox and getting high open rates, spread out your emails over several hours instead of sending one-shot blasts.
Doing this will make your email activity look more human-like, which is the #1 rule for preventing emails from going to spam. Real cold email automation tools should include a delay between each email - that way, you can send out emails in waves without sounding robotic.
You can't just rely on one-off warm-ups before you send emails - you need to stay consistent. Positive activity from your emails, such as people opening them, clicking them, replying, or marking them as important helps to prevent landing in spam.
Email providers like Google and Microsoft take these metrics into consideration when evaluating whether a message is suspicious or not. Without consistent warming-up activity, you'd need an amazing offer with the perfect subject line and copy for all of your emails - something that's nearly impossible to achieve without fail!
If you're sending out email campaigns, your deliverability, and reputation will take a hit when a portion of your emails are marked as spam. This can be balanced by warming up your account consistently.
Additionally, having a linear activity is paramount to successful email deliverability, so aim for consistent engagement and build up a strong reputation in the long run!
Note: make sure you set up an email account that will meet your sending requirements in the end. Different accounts from various email service providers offer different sending limits. You won’t get even close to the limits while warming up the account, but when you start sending outbound campaigns for real – this will matter. So think ahead and choose wisely.
Authentic Email
Use cold emailing software (not email marketing software)
If you're about to start a cold email outreach, it's important to choose a platform that is specifically designed for this purpose.
Traditional email marketing tools like Mailchimp, ConvertKit, ActiveCampaign, or MailerLite may not always be the best choice. Even if they are used successfully, one might run the risk of being reported as spam and getting banned from these services.
Cold emailing software typically includes features such as inbox warm-up, tracking options, merge tags, automated follow-ups, A/B testing, and more. Moreover, most of them offer a plain text editor rather than an HTML editor to design emails. Choosing the right tool can help ensure better engagement with prospects and maximize your results.
Use a Name in the From Field
Are you more likely to open a cold email from frank@yourcompany.com, or info@yourcompany.com?
Don't use the generic donotreply@email address when sending emails. Instead, use your own email address and take it a step further by including your name in the message to help build trust with readers.
To maximize deliverability, you should also focus on factors such as reputation, authentication, and content quality as part of your overall strategy.
Here are some components for a deliverable email address:
The ideal sending address represents a human, not a brand or a mix of the two.
It has to be nominative (e.g john.doe@company.com), not generic (e.g sales@company.com)). Who wants to talk to “sales@youareacashcow.com”?
For the sender name, use a First and Last name. DON’T use a brand name or a “Brian from XYZ” name, that brings poorer results.
Your DNS Records
When setting up a new domain for your email, it is essential to establish all the technical foundations that are necessary for successful delivery.
Email authentication is the key to keeping cyber criminals at bay, not only by providing extra security but also by verifying to ISPs that your emails come from a verified source and are not malicious.
By following this necessary step in setting up your domain, you will gain credibility with ISPs and gain better chances of successful email delivery!
There are three standard email authentication methods used, let's look at them one by one.
SPF
What is SPF?
SPF (Sender Policy Framework) is a security protocol that prevents malicious entities from sending emails on behalf of your domain. By creating a list of authorized IP addresses, communication between DNS servers is made easier and your domain can be verified as trustworthy, adding an extra layer of protection to ensure successful email delivery.
The actual process is very simple:
When an email arrives in your prospect’s inbox, a DNS check is performed.
If the IP address matches the list of authorized addresses, then the SPF test is positive. The email is allowed to reach the inbox.
If the IP address does not match, then the SPF test fails. This is called a Soft Fail. The email is still acceptable to the inbox, but since it failed the SPF test, it is discarded.
Let’s say you’ve sent an email to David. But how does David’s DNS server know that the email was in fact sent by you? The problem is, it doesn’t really. Unless you have SPF set on your DNS server.
SPF defines which IP addresses can be used to send emails from your domain. So let’s imagine two possible server “conversations”. To make it all easier, let’s assume your name is Jane.
Scenario 1 – You don’t have SPF set up.
Jane’s server:
*Hey, David’s server. I’ve got a new message from Jane.*
David’s server:
*Hi Jane’s server. What’s your SPF?*
Jane’s server:
*Yeah, about the SPF… Who cares, really. I don’t have one. Trust me, it’s from Jane.*
David’s server:
*If you don’t have SPF, I can’t be sure it was Jane who sent this. Give me Jane’s allowed IPs, so I can compare them with yours.*
Jane’s server:
*I don’t have the list of Jane’s allowed IPs.*David’s server: Then I don’t want your message. Delivery denied. Sorry, buddy…
Scenario 2 – You do have SPF set up.
Jane’s server: *Hey, David’s server. I’ve got a new message from Jane.*
David’s server: *Hi Jane’s server. What’s your SPF?*
Jane’s server: *There you go, here’s my SPF. There’s a whole list of IPs that Jane herself declared as the ones which can be used on his behalf.*
David’s server: Ok, let me see… And the message you have for me is sent from IP 64.233.160.19. Ok, it’s on the list. Everything looks fine. Gimme the message, I’ll show it to David. Thanks!
What apps should you include in your SPF?
You should have all the programs that send emails using your domain name in your SPF. For example, if you use Google Apps to send emails from your domain, put Google in your SPF. Here are Google’s instructions on how to do this.
But it’s important to make sure, that Google is the only app that you should “allow” in your SPF.
Why is SPF important for your case?
Properly setting up SPF will give your emails an extra layer of security, leading to better deliverability. This means that having an SPF record published increases your chances of being accepted by email servers, as well as giving you fewer chances of being blacklisted.
Overall, setting up SPF will give you peace of mind and higher email deliverability!
How can you set it up?
You need to publish a TXT record on your DNS to enable SPF authentication.
Go to your domain provider (GoDaddy, Cloudflare, Namecheap, Gandi, etc.) and sign in.
Go to the page for updating your domain’s DNS records. It could be called "DNS Management", "Name Server Management", or "Advanced Settings".
Find your TXT records and check if your domain has an existing SPF record (starting with “v=spf1…”).
If your domain already has an SPF record, delete it.
Create a new TXT record with these values:
a. Name/Host/Alias: Enter @ or leave blank
b. Time to Live (TTL): Enter 3600 or leave the default
c. Value/Answer/Destination:
v=spf1 include:{{thirdparty.com}} ~all
{{thirdparty}} being the code snippet corresponding to the third-party tools that you are using to send emails.
It can be Email Service Providers like Google Workspace, Outlook, but also Email marketing tools like Mailgun, Sendgrid, Sendinblue, or Mailchimp.
Please refer to the code list to find the code snippet corresponding for the tools you're using.
When the SPF record is published, wait for propagation (it can take up to 48 hours).
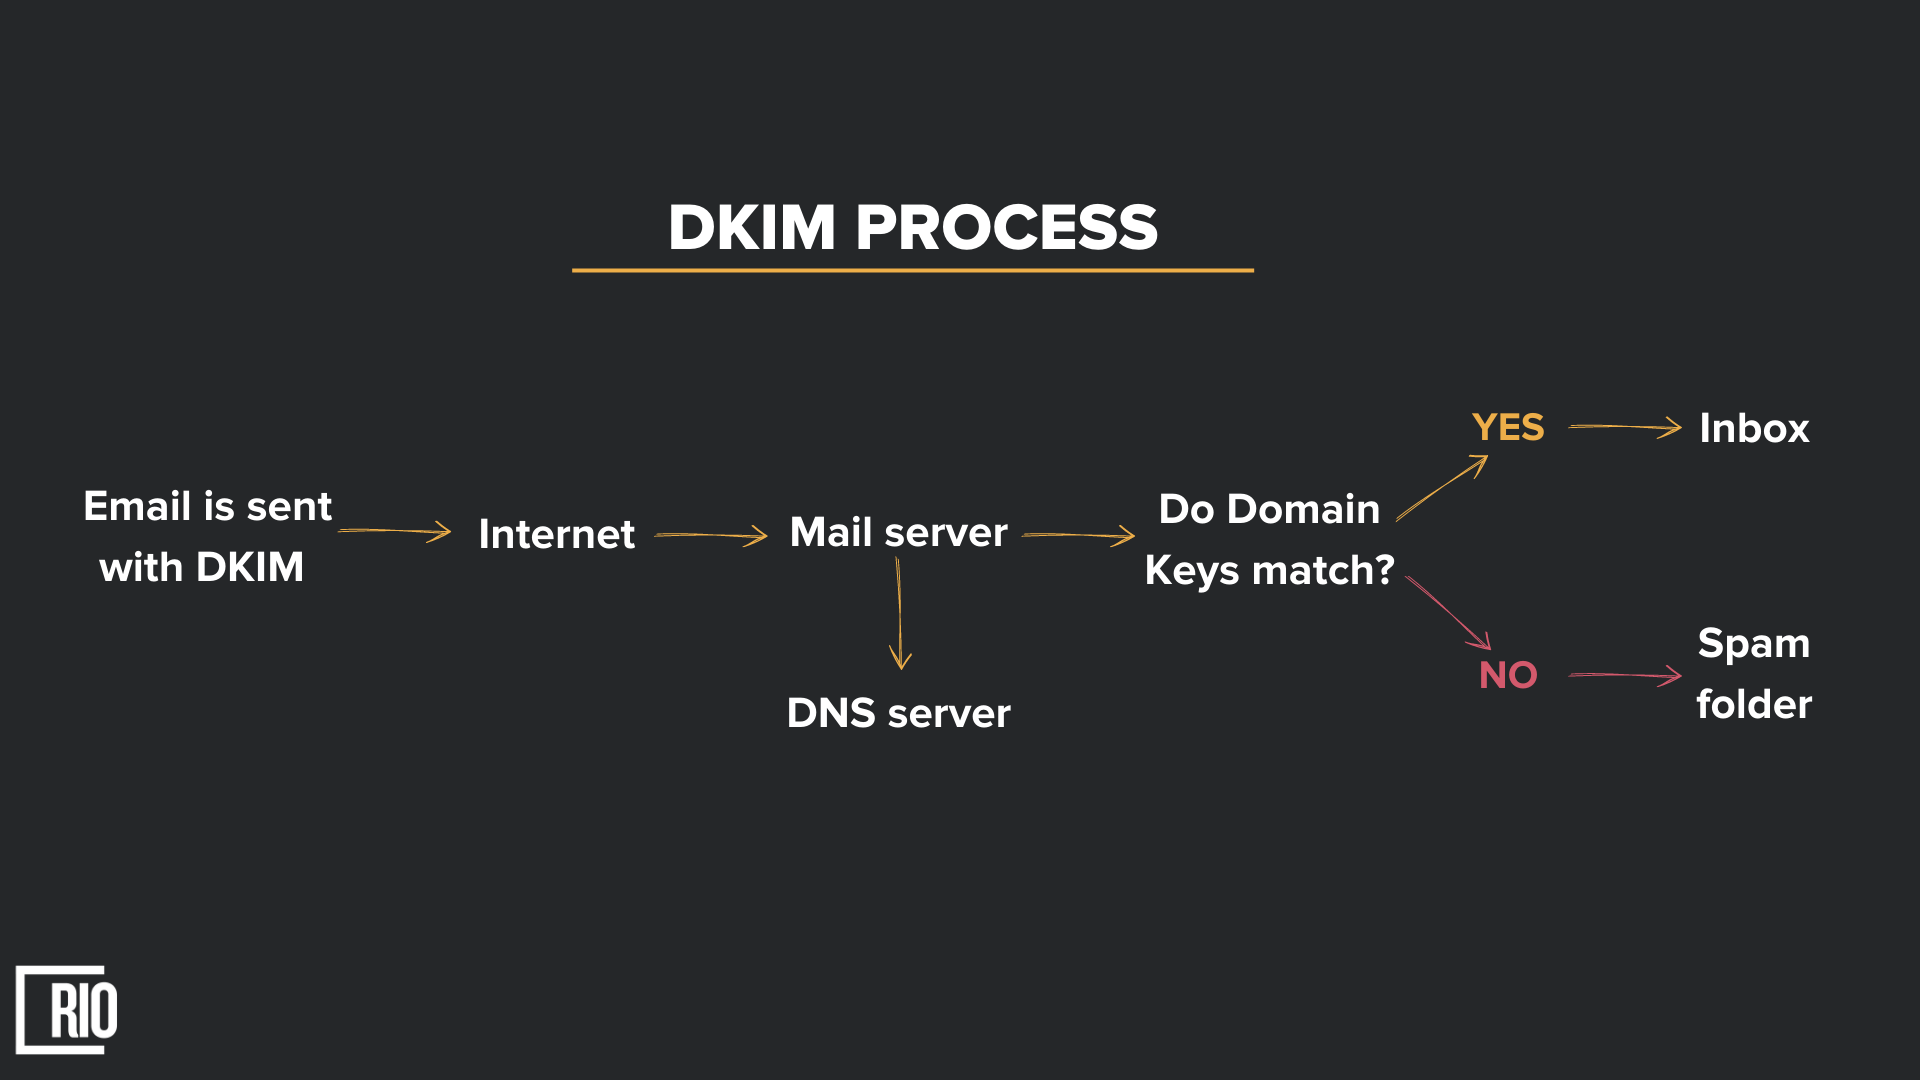
Say hello to Domain Keys Identified Message (DKIM) - a digital signature that's applied to outgoing emails at the point of sending. This signature stays with the email as it makes its way to its destination and is validated upon arrival by the email recipient.
Here’s how the process works:
Picture Ned Stark (from Game of Thrones) sending a raven with a message to King Robert. Just like a forged signature, anyone could take a piece of paper and sign it as Ned Stark - unless there is an authentication mechanism in place.
In this analogy, the seal is a sort of public key - everyone can see the dire wolf symbol that is Ned's signature seal, but only he has access to the original one (the private key). This way, his messages can be authenticated.
What DKIM does:
DKIM adds an extra layer of security to your email.
A public key is added to the domain's DNS, which allows a digital signature to be created with hashed details on the email header and footer. The encrypted individual private key is also included.
When the email arrives, the server looks for and retrieves the public key, which is then used to create new hashes and compare them to the ones that were sent - if they match, it means the test was successful and your email will land in someone's inbox.
If this test fails due to any altering in the hashes, then the DKIM test fails and your email is discarded.
DKIM is a more secure protocol than SPF as it carries more detailed information. To ensure your emails are authenticated properly, it is important to regularly update the public and private keys associated with your domain.
The whole idea is based on encrypting and decrypting the additional signature, put in the header of your message. To make that possible, you need to have two keys:
the private key (which is unique to your domain and available exclusively to you. It allows you to encrypt your signature in the header of your messages.)
the public key (which you add to your DNS records using the DKIM standard, in order to allow your recipient’s server to retrieve it and decrypt your hidden signature from the header of your message).
To set up DKIM, all you need to do is add the public key information to your server's records. This should be done in the form of a text (txt) record, which must be placed in the appropriate location.
Why is DKIM important for your case?
Adopting the DKIM protocol for your emails will provide greater security and improved deliverability. If you don't have a DKIM record, some email servers will block access to the emails from this domain. To sum it up, setting up DKIM can help keep your emails safe and ensure they make it to their destination.
How can you set it up?
You need to generate a pair of keys and publish a TXT record on your DNS to enable DKIM authentication.
Login to your Email Service Provider as admin.
Look for the DKIM setup, likely to be in the "Security" or "Authentication" section.
Generate a DKIM Key directly from your Provider or use a DKIM Key generator.
Go to your domain provider (GoDaddy, Cloudflare, Namecheap, Gandi, etc.) and sign in.
Go to the page for updating your domain’s DNS records. It could be called "DNS Management", "Name Server Management", or "Advanced Settings".
Create a DNS TXT Record with the DKIM key generated in the previous step and the information given (Host Name, Record value, and leave TTL value by default).
When the DKIM record is published, wait for propagation (it can take up to 48 hours)
Note: For Google Apps email users, you should know that on default the DKIM signatures are turned off, so you need to turn them on manually in your Google Admin console.
Here’s how to set DKIM in some of the other domain hosts:
DMARC (Domain-based Message Authentication, Reporting, & Conformance) is a powerful email authentication protocol that unifies SPF and DKIM authentication into one common framework. This ensures the emails coming from your domain are authentic and protected from spam filters. Having all three protocols in place will keep your emails secure and make sure they reach their intended destination.
DMARC helps improve email security by allowing you to set up rules for when an email fails to pass authentication and providing reports on email performance. This makes it the best option for verifying the authenticity of emails.
Most hosting servers and ESPs provide instructions on how to set up DMARC, SPF, and DKIM. To verify your DNS records, you can use a DNS Lookup Tool.
Here’s how it works:
When a DMARC-aligned email reaches your prospect’s inbox, an SPF and a DKIM check are performed as usual. Then, a domain alignment test is performed.
Simply put, this test matches the sender’s email address with the one stored in the SPF and DKIM records.
Once passed, the email reaches your prospect’s inbox.
You have the ability to change how strict or flexible the checks are. For example, if you make the domain alignment test very strict, fewer emails will pass the test. If you make the test more lenient, more emails will pass.
Why is DMARC important for your case?
DMARC is the perfect addition to DKIM and SPF for keeping unauthenticated users from sending emails from your domain. Not only does it protect your brand, but it also sends trust signals to ISPs which results in improved deliverability.
How can you set it up?
You need to publish a TXT record on your DNS to enable DMARC authentication.
Go to your domain provider (GoDaddy, Cloudflare, Namecheap, Gandi, etc.) and sign in.
Go to the page for updating your domain’s DNS records. It could be called "DNS Management", "Name Server Management", or "Advanced Settings".
Add this TXT Record to your DNS:
a. Name/Host/Alias: _dmarc
b. Time to Live (TTL): Enter 3600 or leave the default
c. Value/Answer/Destination: Replace {email} with your email address.
BIMI (Brand Indicators For Message Authentication) helps you protect your emails from fraud, build brand visibility and boost consumer trust. It works in tandem with other email authentication protocols such as DMARC, SPF, and DKIM to double verify that it's you sending the emails.
Additionally, BIMI also displays your brand logo next to the verified emails which not only set you apart but increases user engagement as well. This is further supported by ESPs who will recognize that you have existing security protocols in place for your domain.
MX Records
Run a check with Google’s Check MX tool once you’ve added all authentication systems. This check will let you know if you set up your records correctly. If you didn't set them up correctly, you'll get a notification showing which records still need to be configured.
If you see the green checkmarks, you’re set.
IP
Remember, your IP address also impacts the sender’s reputation that comes with each of your emails.
Platforms that allow you to send bulk emails usually offer Shared IP addresses as the default option. This makes their services more affordable but doesn't give you any control over your IP reputation.
The operators do conduct quality checks and rotate between several hundred IP addresses to keep deliverability rates high for all their customers. For most people, this will be more than enough - a Shared IP address is more than adequate for their needs.
If you have a large contact list and need to send emails regularly, having a Dedicated IP address can be beneficial. It gives you more control over your sender's reputation.
However, don't just blast out emails the first day - receiving servers need to be introduced to who you are and that your messages are both legit and wanted by your audience. Gradually build up the volume over time for best results.
Companies usually begin by sending small batches of emails and gradually increase the volume. How you send your messages also plays a role in boosting email deliverability - these tried-and-true practices will help you achieve success.
When you send emails from your own custom domain, you not only come off as professional but also gain control over your inbox placement rate. Your reputation is closely related to the practices you employ and the same applies to IP addresses, though on a somewhat lesser basis.
This approach gives you the power to protect your reputation and make sure that whatever messages you have to convey, reach their destination unharmed.
For small businesses, investing in a dedicated IP may not be the best idea - mistakes would be more costly and the sending volume might not be enough to balance it out. On the other hand, having sole responsibility over DNS records and being able to easily whitelist your IP can be great advantages when it comes to larger companies.
As I said earlier you can try to improve your sender reputation by using a dedicated IP address because you are the only one sending emails over the IP address. This means that you won't have to worry about other people's emails. But it is only good for businesses that send out a lot of emails each year, like more than 100,000.
For smaller organizations that send fewer than 100k emails a year, a shared IP address can be the perfect solution. Not only will they benefit from the best practices used by other senders, but they'll also gain from the increase in their sender's reputation. It's an excellent way to tap into the advantages of collective mail sending with minimal investment.
Encryption
Commercial emails contain sensitive customer data that must be protected from unauthorized access. To ensure this, check if the email software of your choice provides TLS (Transport Layer Security) encryption.
Services like Zoho Mail or Sendinblue usually provide this type of encryption, but it will only work if the recipient server supports TLS as well. Otherwise, emails will be delivered using standard SMTP protocols.
Note: SMTP or Simple Mail Transfer Protocol is an application that is used to send, receive, and relay outgoing emails between senders and receivers. When an email is sent, it's transferred over the internet from one server to another using SMTP. In simple terms, an SMTP email is just an email sent using the SMTP server.
On the other hand, make use of the latest encryption standards TLS Encryption – Transport Layer Security (TLS) is a powerful protocol that helps safeguard the privacy of sender and receiver by encrypting messages in transit and preventing manipulation by third parties. For even more security, MTA-STS is a new encryption standard that provides an extra layer of protection for email transmissions, giving you peace of mind knowing your data is secure and confidential.
Relevant Content
Are your recipients clicking on links, replying to you, and marking your emails as important? All of these behaviors are vital for ensuring excellent deliverability rates, which is why it's so essential that your emails are genuinely good and useful.
Taking the time to create content that resonates with your subscribers is key to ensuring good email deliverability. But if the emails you send don't match their needs and expectations, they won't engage, resulting in a drop in deliverability rates. So, once again, watch out for spam filters – even if you weren't trying to be deceptive, sending unsolicited or suspicious content can land you in hot water!
So take care when crafting your emails and make sure each one meets all the necessary standards.
Here are some factors that can improve the content of your email:
Make content that is tailored to each person and is interesting to them. Use tools to group people by shared interests or characteristics, and make sure the content in your email changes to match them.
Make your emails look good by arranging the information in a way that is easy to read. Use headings and sections to divide the information up, and include buttons people can click on that ask them to do something (but not too many!).
Prioritize mobile-friendly design. Make sure your emails are easy to read, even during a hectic commute.
Try not to include really big files with your emails. Email companies don't want to overwhelm people's inboxes with huge messages, so they might remove your email if it's too big.
Try to have a balance between pictures and words in your emails. If you only use pictures, it might look like spam. Try not to have more than 40% content as images...
Avoid spammy subject lines and all caps. A clickbait-like message is an immediate red flag for any email service filtering system.
Run A/B testing. Test different images, layouts, and buttons to find the right formula and increase your open rate.
Here is an important question that needs to be answered:
Does a good copy protect you from being blacklisted?
Yes, in general, a good copy that provides some value to the prospect helps you take care of the safety of your domain.
Writing effective cold emails that don't get flagged by spam filters or seen as 'spammy' by our target audience is becoming increasingly difficult. As the market becomes more saturated with cold emails, it's easy to make a mistake that can cause your email to be marked as spam.
It's essential to pay attention to the language and content of our emails, so as not to send off any negative vibes that could be interpreted as 'spammy'.
You may put a lot of time and effort into crafting the perfect email for your prospects, but even then it can be seen as 'spammy' and marked as such by the reader before they make it to the end. Even if you do all you can to ensure positive engagement, it pays to remember the possibility that your email could be seen as an unwelcome offer – so take care when creating your content!
In this section of the guide, I'll talk in detail about what makes your content inherently spammy and how can you turn it into a high-quality cold outreach (that works!!!).
Set up the from line and signature
When getting your email account set up, one of the most important steps is getting your signature and form line straight. Make sure you're using accurate information – no need for fake names or identities; you're a real person, so let your email provider know that! For Gmail users, consider adding a profile picture too – it can go a long way toward making sure you don't get tagged as spam.
If you're opting for an HTML signature, make sure it's well-crafted so it won't take up more space than your actual message. Ensure the HTML is neat and tidy – if you're not sure how to check that, a text signature might be a better option, as a poorly written one could land your email in spam folders.
Spammy Keywords
From the sender's reputation to the content of the email, spam filters scrutinize every aspect while filtering out messages. But how about our own human judgment? We can be just as critical, if not more, as an automated filter. Our own perception may lead us to flag emails as spam if they don't meet certain standards—no matter who sent them.
Now, brace yourselves, right now we'll go into detail about the main aspect of your emails' content that should be taken into account to avoid both automatic spam filters and spam reports from recipients:
a) Spam triggering verbiage
Yes, spam-triggering verbiage exists.
Words and phrases that seem too good to be true—they are. Too often, when an email is sent out, it's instantly flagged as spam because of certain trigger words that may be hiding in the content. We can't always trust the offer being made—it could be maliciously crafted to obtain unsuspecting victims' private information.
Marketers and salespeople must take extra care when crafting their emails, so they don't end up with a one-way ticket straight to the recipient's virtual trash bin. A study by Ortto found that 14.7% of emails get caught by spam filters.
Here are some words and phrases that are regarded as spammy by ESPs:
Buy now!
Click here
Hurry up
XXX
Offer expires
Urgent
Best price
Free gift
Prize
Promise you
100% free
Be careful with the words you chose, don't use too many big words, emojis, all caps, special characters, or weird fonts.
Don’t make your words too ‘salesy’, and avoid using the dollar sign, too many bolded words, all-caps, FREE!!, and emojis in cold and business emails.
Note: Here is a curated list of 400 spam-trigger keywords that you should avoid using in your emails. You can find out the list in this article.
Email providers are taking extra precautions to make sure their users' data is secure and compliant with the new GDPR legislation. This can lead to stricter spam filters, which may be more likely to flag certain words or phrases as suspicious. To ensure your messages arrive safely at their destination, it's important to be mindful of these regulations and take special care when crafting your emails.
b) Avoid spammy titles
If you’ve got a legit mailing list and interesting content, you shouldn’t have to use BuzzFeed-like expressions to get people to open an email from you.
WRITING YOUR SUBJECT LINE IN ALL CAPS or including too many exclamation points!!! - this will get you into spam immediately.
While typos and red text can quickly label your message as spam, specific phrases included in your body copy can do that too. To ensure your email not only looks professional but also bypasses the filters, it's critical to be mindful of both spelling and word choice. However, one slip-up could cost you dearly; even a stellar reputation might not be enough to guarantee delivery if a filter takes an unfavorable view of your message.
Here are 455 examples of the phrases you just shouldn’t use in your emails. You can do better than that.
Personalization is important to stop emails from going to junk
Personalizing emails is a fantastic way to stand out in the inbox and increase your chances of success.
Not only does it help build relationships with your recipients, but they're far less likely to be caught by a spam filter. So don't just send everyone the same content - take a few extra minutes to personalize each message and ensure your campaigns get the best results!
Writing email copies that convert is a skill. Investing time to learn to copyright will help you increase your email results, including avoiding the spam folder.
People can mark your email as spam for different reasons :
Your email is irrelevant to them
Your email contains an error they didn’t like (‘Hi Last Name’ for example)
When you send an email to someone you've never spoken to before, it can come across as a bit of a gamble. After all, your recipient may be hesitant to open any attachments from a sender they don't recognize.
At first glance, attaching files or images in emails might seem like a useful way to get the attention of your prospects. However, due to the history of malicious attachments used by scammers, email providers are understandably wary and will often block them from showing in emails sent by unknown senders.
Although it might be discouraging that this practice is required for safety reasons, there's still hope as long as you craft your message carefully and use the right words - you can turn this initial distrust into an eagerness to explore what you have to offer.
By steadily building the relationship and introducing them to what you have on offer bit by bit, you'll be able to get the most out of your emails.
If you do have important information you need to share, you can do this without using attachments, HTML, and images:
Create targeted landing pages for different prospects
Share a link to the file on DropBox, Google Drive, YouTube, etc.
It's understandable that email providers are concerned about protecting their customers, but that doesn't mean you have to abandon attachments, HTML, and images altogether; while they may be seen as red flags, there are still ways to use them safely and effectively in your emails.
With the right knowledge and careful crafting of your messages, you can avoid getting blocked by spam filters while still making an impression on your prospects.
Be aware of inserting too many links and images
When crafting emails, it is best to include no more than two links and maintain an image-to-text ratio of 40% image and 60% text. Doing so will help you avoid any deliverability issues caused by spam filters.
If you are just starting out and unsure of the best practices, it may be better to avoid including any links or images in your content to ensure the successful delivery of messages.
When sending emails, it is best to keep the number of links, images, and gifs at two or lower. Doing so will help you avoid any deliverability issues caused by spam filters.
Short URL
Short URLs are links that have been truncated through a URL shortener, such as Bitly. As they allow click tracking and branding of the shared links, they present a great advantage for marketers.
Unfortunately, scammers and spammers can also take advantage of them to hide the destination page of malicious links. To prevent emails from being put in junk, most spam filters track the presence of shortened links within emails.
Using short URLs can damage your deliverability and sender reputation, potentially resulting in domain or IP blacklisting.
Broken links
A broken link or dead link is a hyperlink on a web page that no longer works and redirects the users that click on it to a 404 error page.
A link can be broken for different reasons:
There is a typing error in the URL (can be a space, or an additional number of letters).
The destination page doesn't exist anymore.
The destination website of the link doesn't exist anymore.
The user has software or is behind a firewall that blocks access to the destination website.
Broken links in emails can be especially deceptive for recipients, as they lead to error pages rather than the content you wanted to share. As a result, emails with broken links are more likely to be reported as spam and have a negative effect on your email deliverability.
Some spam filters directly flag any emails that contain dead URLs, so it's important to be sure all of your links are working correctly before sending out an email.
The best practice is to always verify the links you send through emails, or to test your emails with tools like Warmbox "Email Spam Checker".
Engaged Recipient
Email engagement measures how your prospects interact with your emails - from opening and reading to clicking links or replying to your email.
It's the key metric of whether they're interested in what you have to say, so it's important to track and understand your email engagement levels if you want to ensure successful marketing campaigns.
When it comes to email engagements, there are two types: positive and negative. Positive engagements are when prospects read, reply, move to different folders, or mark as important.
Whereas negative engagements involve not opening the mail and deleting it without reading or marking your email as spam. Of course, positive engagements will help improve your sender's reputation while negative ones will have the opposite effect.
SDRs need to measure email engagements carefully. A lot of prospects might not even open or read the cold emails they send out, which can have a damaging effect on their sender's reputation, leading to worse deliverability rates. Tracking this metric is essential for successful outreach efforts.
To get high open rates and overall great cold email results, that’s important for you to…
…Be picky concerning your email lists
Here’s what I mean by “picky”
1. Your email list should contain MOSTLY nominative professional email addresses
When sending emails, it's important to target specific individuals and not generic email addresses such as contact@xyz.com. This is because generic emails are hard to personalize and can be sent to multiple people, increasing the risk of being marked as spam.
2. Your list should contain the basic personalization elements such as the name of your recipients and ideally their company name to maximize your results.
When sending emails, you should always personalize them with the recipient's name and company name to get the best results. This will make sure each email is tailored specifically to that person, which increases your chance of getting a response without being marked as spam. Always include a personalized greeting like "Hi [First Name]" for maximum impact.
3. Your email list has to be TARGETED.
You need people who might be interested in your product or service on your list. You cannot know if Marie will buy something until you talk to her, she needs to be someone that you are targeting for your product.
Let’s take an example:
You sell fundraising services to startups and small companies. You want to reach out to relevant companies that can be interested to raise funds with you.
When you’re at the step of working on your email list, you have to make sure it effectively contains CEOs / Founders of startups and small companies that CAN raise funds.
That means :
excluding people who are not CEOs / Founders like (“PA to the CEO”, and “CEO’s Right hand”)
excluding companies that can’t raise funds, like public companies/nonprofits, etc.
If you send emails to people who are not interested, it will make them angry. And because of that people may report your emails as spam. This, in turn, could hurt your reputation and mean that you waste time talking to people who don't care about what you have to say.
Create positive feedback loops
Even if you haven't been marked as spam, it can still be discouraging when a lot of people don't respond to your emails. But the upside is that each time someone does reply or adds you to their contacts, it's a strong sign that you are an emailer with credibility, and this will improve your overall email reputation.
Spam reports (or spam complaints)
A spam complaint happens when someone clicks the "mark as spam" option in their email. Email service providers take these complaints seriously because it means the recipient is unhappy with your content.
If your complaint rate continues to go up, your sender reputation will drop and it will become harder for you to get emails delivered to the primary inbox. But don't give up hope – there are still plenty of steps you can take to try and improve your sender reputation and ensure you're landing in the inbox!
As mentioned previously in the sender reputation section of this guide, try to keep your complaint rate less than 0.01%. If a user marks you as spam, immediately remove them from your list to avoid any further complaints.
One can mark emails in your inbox as spam, and this helps email providers like Gmail better understand what spam is. However, when someone reports one of your emails as spam, it will get added to an abuse report on you as a sender. If too many people do this, you may be seen as a questionable sender and your emails could be blocked from delivery.
To avoid abuse reports, send only personalized and relevant messages to your recipients.
Optimize Your CTA for Replies
Getting high open rates and click-through rates (CTRs) is great, but it's not the only thing that matters - focusing on getting real engagement from your emails is key too. Putting time and effort into writing personalized messages with a clear call-to-action will help you build lasting relationships and get better results.
Examples of call-to-actions that can work are:
Is that something you’d be interested in?
Are you available to chat?
What’s your biggest challenge around {[topic}} right now?
When crafting your emails, make sure to include a clear call to action that encourages people to reply. The CTA should be easy to answer and not require too much thought. Even if they're not interested, having people reply with a simple "No, thank you" is still better than no response at all - this means your email service provider will see it as engagement.
Optimize some emails for replies instead of clicks
Having real people send out emails is a good move, such as salespersons, account managers, support staff, or even the CEO. You can make these emails more engaging by asking a question at the end - this will encourage customers to converse with you.
An example of turning a regular automated email into a conversational one
Types of reactions
Positive reactions
a. Message read – ISPs track which messages were read and which weren’t. In addition to that, the longer the message stays on the screen adds more value to this metric.
b. Moved to folders – When users place emails in folders, it means that they want to keep the message safe and wish to receive more from the sender.
c. Message forwarded – When an email message is forwarded, it indicates that the user expected and desired it
d. Sender’s email address added to address book – When the sender’s email address is in the recipient’s address book, it guarantees that emails will enter the inbox no matter how poor the metrics are.
e. Message marked as not spam – ISPs find an email marked as not spam by the recipient to be a crucial metric. It shows the sender in good light as marking a message as not spam requires the recipient to put in the effort.
Negative reactions
a. Messages deleted after the recipient read them – Reading a message may seem to be a positive reaction. Still, when the recipient deletes the message after reading it, it indicates that the message was of no use to the user.
b. Messages deleted by the recipient without reading them – This is an adverse reaction, and it makes the ISP understand that the message was not of interest to the user. Sending emails repeatedly to an account that doesn’t engage with the emails can result in future emails getting filtered out.
c. Blocking sender’s email address – Some ISPs allow recipients to block a sender’s address so that they don’t get messages from that sender in the future. This is by far one of the most negative reactions.
d. Message marked as spam – This strongly indicates that the recipient does not want to receive your email. All emails sent after this action will end up in the spam folder of the recipient. This increases the chance of getting filtered out in the mailbox of other recipients too.
Deliverability checklist
So, now we are wrapping this guide lets make your life easier and email management simpler. For that purpose, I introduce you to a simple deliverability checklist:
Good IP address reputation
Good domain reputation
Email account is warmed up (for at least a week)
Sending habits mirror regular human activity
Max. 150 emails per day per email account
Max. 2-3 domains per IP (best is only 1)
Max. 2-3 email accounts per domain (best is only 1)
Minimum 3 minutes delay per email sent
DKIM is properly set up
SPF properly set up (DKIM, SPF, DMARC)
DMARC properly set up
Email contains no HTML
Email contains as few links as possible
Bounce rate less than 10% (all email addresses are verified)
Emails are only sent to an individual's email addresses and not to any generic email
Anti-pam regulations are all about keeping spam out of your inbox. They set out rules and guidelines for all email senders, making sure they provide their contact info and follow data privacy measures — so that only legit emails reach you.
Many people are worried that these regulations mean that the cold outreach is doomed. But it’s not completely true.
Still, there are certain things that you should follow in order to stay compliant. Let’s look into some specific spam regulations and what you can do about them:
GDPR – European Union
GDPR is a set of privacy laws passed by the European Union to protect individual EU citizens and their personal data. It's all about making sure that companies don't abuse people's information, whether it be through spam emails or anything else.
In other words, GDPR helps keep your data secure and out of the hands of those who may misuse it. So if you're doing business in Europe, make sure you're compliant with this important regulation!
Here are some tips to stay compliant with anti-spam regulations:
Personalize your emails. Get to know your audience and make sure that what you're writing resonates with them.
Always provide an opt-out link in your emails so people can easily unsubscribe.
Use your real name when sending emails - don't use a generic server or company name.
Make sure the tool you use is GDPR compliant, meaning people can delete their name and email from your contacts list if they choose to do so.
CAN-SPAM – United States
CAN-SPAM stands for Controlling the Assault of Non-Solicited Pornography and Marketing Act.
It's a law in the United States that requires businesses to provide contact information, an opt-out option for further messages, accurate headers & subject lines and prohibits fraudulent activities like phishing or spamming in emails.
Those who don't comply can face penalties including fines up to $44,000 or even jail time depending on the severity of the offense.
But let’s not get ahead of ourselves and discuss simple tips that will help you stay compliant with the CAN-SPAM:
Provide your details. Your email has to clearly identify who you are, and the name of your business (or your real name) - the “From”, and “Reply to”, and routing information sections have to be accurate and correspond with your personal or business information.
Don’t use misleading subject lines. Do tell your recipient what they can expect to find in your email.
If your email is an ad, admit it. This doesn’t mean that you should include the word “ad” in your subject line, but make sure to say “this ad has been sent to you by XYZ” at the bottom of your email.
Provide your physical business address. In case you receive your business correspondence in the P.O. box, use it.
Make opting out as easy as possible. It’s essential to place an opt-out button in every email you send.
Remove opt-outs as quickly as possible. Once a prospect opts out, exclude them from all your ongoing campaigns.
Mail-tester.com is a simple, efficient tool that tests email deliverability in one step. You just need to send a message to the provided address and get an accurate score. It shows what SpamAssassin thinks about your message if your mail account is on a block list or not authenticated, etc. The free version allows you to perform up to 3 tests per day.
MxToolbox provides a comprehensive deliverability report which analyses the headers, blocklist reputation of your outbound IP address, and your SPF records. The free plan allows for one monitor with access to the top 30 blocklists, and upgrading to the paid plan gives you access to multiple monitors and more blacklists.
Spam Check by Postmark is a free, online tool that lets you instantly check the SpamAssassin spam score of your messages. It uses a variety of spam-detection techniques to determine deliverability and allows you to paste the full headers and content of your message - no need to send it anywhere.
GlockApps is a full-featured service that offers everything you'll need to maximize inbox deliverability. It includes an email tester, blocklist monitor, spoofing detector, HTML error checker, and more.
It checks against over 50 industry blocklists and tracks if your content or IP is blocked by Gmail, Yahoo, or other ISPs. MailChimp users can easily test their marketing campaigns directly on the GlockApps website. Free users get three detailed reports and there are plans available for an annual subscription, monthly subscription, or per-test basis.
SendForensics is an email deliverability checker that highlights the issues that send emails to the spam folder by performing pre-emptive tests and real-time scoring of live sends. It provides a comparison with industry benchmarks so you can track how well you're doing as well as set alerts to quickly detect emerging issues.
I mentioned this above, but if you’re sending cold emails, you need a well-warmed-up email address. Assuming you don’t want to do it manually, using an email warming service is a great shortcut.
MailFlow sends emails to people every day, simulating real exchanges between email accounts without interacting with spamming accounts. This helps to build trustworthiness with inbox providers. The email warm-up tool is free and integrated with QuickMail, as well as provides access to the entire sales outreach platform to send, schedule, and follow up with prospects.
Talosintelligence.com is a website that provides cyber security intelligence and analysis. It helps users to defend their networks against malicious actors by providing real-time, comprehensive protection from emerging threats. It also offers insights through research on the latest trends in cyber-attacks, as well as actionable information on how to keep systems secure.
Talosintelligeure out if your IP is blacklisted or not.
Mxtoolbox.com/blacklists is a tool that allows users to check if their IP address or domain name has been blacklisted. It helps to ensure emails are delivered without interruption and protects website visitors from malicious activities online. The tool offers real-time monitoring, alerting, and reporting capabilities so users can take action before their reputation is affected by blacklisting.
You see, getting into spam is much easier than into the recipient’s inbox, but it doesn’t mean that getting into the inbox is impossible.
If you do your best to maintain the domain’s reputation and follow anti-spam guidelines – your chances to reach the prospect’s inbox will be much, much higher!
FAQs:
Q1: Can a domain be too old?
No such thing! Time is on your side in this case, provided the domain is well-kept and has always had a good reputation. Deliverability depends on a domain’s reputation to a great extent, so make sure your domain maintains its good reputation over time. Monitor open rate over time, don’t use the same email copy for too long, and take care of the high quality of your prospect list.
Q2: Is there a list or tool to check my email for SPAM words?
Unfortunately, there’s no ultimate list of all the spam words. Spam filters constantly make changes to their algorithms. You may want to go through a few spam lists available on the internet, such as the ultimate list of email spam trigger words prepared by Hubspot, and add a few tweaks to your email copy in order to avoid specific words, if necessary.
Also, there are tools that can analyze the content of your emails for spam words, such as Postmark.
Q3: What can I do when my domain has a bad reputation?
If your domain has a bad reputation, you need to implement a recovery process. It’s actually quite similar to the warming-up process. Stop all your cold email campaigns and get back to the starting point. Send just a handful of emails per day to people you know and ask them for replies. Exchange a few emails. If your messages get into the spam folders, ask your recipients to unmark them as spam. This way the spam filters will be notified that your emails matter to the addressee and that you’re not a spammer.
Download worksheets
This content is for subscribers only
Sign up now to read the content and get access to the full library of content for subscribers only.